Difference between revisions of "Accounts"
| (74 intermediate revisions by 4 users not shown) | |||
| Line 1: | Line 1: | ||
| − | + | =What is an Account?= | |
| − | + | Accounts contain complete customer information generated while creating an RPH and a Lead during the sales process. | |
| − | |||
| − | + | When someone accesses an account, they will notice it contains information about the specific site, the human, and the property management company and a record of all the calls, emails, events, and activities of a customer. | |
| − | + | Let us remember something we explained in the Lead Module that might help us to understand better what an Account is: | |
| − | + | == What's a child account, and how does it work?== | |
| − | + | There are two primary types of accounts in our system: parent and child accounts. These accounts look identical, have the same features, but possess different functions. | |
| − | + | For instance, UPS is a package delivery company, and they have many branches across the country, making "UPS Global" a parent account. | |
| − | + | In most cases, a parent account's primary purpose is to hold data of all related sites in one central location. When a user accesses a UPS parent account, they can see all the contacts, related business activities, external proposals, documents, and more, for every UPS site. In other words, this parent account compresses all the information related to the branches (children) and the headquarters (parent) of the same company. | |
| − | + | ||
| + | When the user accesses a child account, they will find the same information but for one specific location only. | ||
| + | Another type of parent account called the "self-managed" account is the universal parent account that contains all those smaller accounts without a logical parent account. | ||
| − | + | == Account protection == | |
| + | To avoid a situation where multiple Account Managers manage a single Contact, we have installed a protection feature. For the column labeled "Prot", a green padlock indicates an unprotected contact, and a red padlock indicates that an Account Manager protects it. | ||
| − | + | [[File:Test.jpg|1000px|frameless|center]] | |
| − | + | The addition of contact related to a Lead or an Account always triggers the Protection. | |
| − | + | Only the Account Manager responsible for the account holds editing permission during the protection period. Those users who do not have special permissions to edit a contact's data will only keep read-only permissions. Once the time is up and the contact is unprotected, all users can see and edit their information. | |
| − | In | + | In rare cases, an account may have shared ownership. For example, a technician unknowingly creates an RPH on an already existing account. When he loads the RPH, the system allows him to have part of that property- he would not be the true owner of said account but would have the permission to edit it. |
== Account and contacts== | == Account and contacts== | ||
| − | When a user modifies | + | When a user modifies an account's contact information, the system automatically changes the account's status to protected so that no one can modify it except the new owner. At the same time, the system protects that account and all those related to said contact. |
| − | + | If a user with sufficient permissions to modify an already protected account makes any modification, the system will restart the protection period for such an account. | |
| − | The contact is the | + | The contact is the critical link that generates the relationships within the system. |
=Accounts Menu= | =Accounts Menu= | ||
===New Accounts=== | ===New Accounts=== | ||
| − | This option takes the user to the | + | This option takes the user to the "New Account" form. For more details on creating a New Account, please redirect to the section in this document [[Accounts#How_to_create_an_Account.3F| "How to create an Account"]] |
===View Accounts=== | ===View Accounts=== | ||
| − | The system allows to list all the existing Accounts on the platform and | + | The system allows the user to list and view all the existing Accounts on the platform and quickly identify whether it is a child or parent account. All parent account rows are highlighted in yellow. |
| − | |||
| − | |||
| + | The user can view the list of the existing accounts in the database, filtered by specific parameters using the search bar and looking among the shown results. | ||
'''Filters available are:''' | '''Filters available are:''' | ||
* Bulleted list item | * Bulleted list item | ||
* Owner: filter by the owner of the Account | * Owner: filter by the owner of the Account | ||
| − | * Quick Search: filter by predefined range of time | + | * Quick Search: filter by a predefined range of time |
* Property type | * Property type | ||
| − | It is also possible to activate the | + | [[File:4.20.jpg|750px|right|thumb]] |
| + | It is also possible to activate the "Custom Search" that will enable more fields of filtering, such as: | ||
* From date (creation) | * From date (creation) | ||
* To date (creation) | * To date (creation) | ||
| − | |||
| − | Once the | + | Once the filter is complete, the system will display the results in a list. The user can further refine the results by writing on the "Search" field (magnifying glass) and verifying if there are matches with any field. |
| − | On the bar above at the right, there are | + | On the bar above at the right, there are two buttons available that work as a shortcut: |
| − | * | + | * ''+Account'': quick account creation form access |
| − | * | + | * ''+RPH'': quick RPH creation form access |
| − | The results can be extracted and downloaded to the local disk in different formats such as CSV, Excel, PDF or | + | The results can be extracted and downloaded to the local disk in different formats such as CSV, Excel, PDF, or directly printed or copied to the clipboard. |
'''Information shown in this columns:''' | '''Information shown in this columns:''' | ||
* Management Company: the Parent account of the shown account. | * Management Company: the Parent account of the shown account. | ||
| − | * Account: work as a shortcut to access | + | * Account: work as a shortcut to access the account. |
| − | * Main Contact: is the | + | * Main Contact: is the primary contact of the account. |
* Street: account address | * Street: account address | ||
* City: account city | * City: account city | ||
* State: account state | * State: account state | ||
| − | * Quotes: indicates whether there are quotes for the account. If yes, the icon | + | * Quotes: indicates whether there are quotes for the account. If yes, the money icon displays in green. |
* Prot.: indicates if the account is protected or not. | * Prot.: indicates if the account is protected or not. | ||
* PARC: indicates if there is any [[PARC|PARC Agreement]] with that account, and what is the status (enabled or expired). | * PARC: indicates if there is any [[PARC|PARC Agreement]] with that account, and what is the status (enabled or expired). | ||
* Last Act.: last activity within/related to the account | * Last Act.: last activity within/related to the account | ||
* Created: date of account creation | * Created: date of account creation | ||
| − | * Owner: owner of the account | + | * Owner: owner of the account who protects the account at the moment. |
From this list there is also access to the column “Options”, with more buttons that work as shortcuts to: | From this list there is also access to the column “Options”, with more buttons that work as shortcuts to: | ||
| Line 89: | Line 90: | ||
===Merge Accounts=== | ===Merge Accounts=== | ||
| − | This module allows the user to merge and | + | This module allows the user to merge and delete accounts. |
| − | When merging an account, all the related info | + | When merging an account, the system will move all the related info to the selected destination account and delete the merged account. The system follows the same process to delete an account, but there is no need to select a destiny account. |
| − | |||
| − | |||
| − | |||
| − | |||
| + | There are ten sections in the form to merge accounts: | ||
* Account Info | * Account Info | ||
* Child Account Info | * Child Account Info | ||
| Line 103: | Line 101: | ||
* Events | * Events | ||
* Tasks Info | * Tasks Info | ||
| − | * Notes | + | * Notes info |
* Emails Info | * Emails Info | ||
| − | * Calls | + | * Calls info |
* Documents Info | * Documents Info | ||
| − | + | These sections make it easier to select and edit the information the user wants to merge. These optional sections can be either hidden or shown. Only the first section "Account Information" contains mandatory fields, the minimum information that will be transferred (merged) to the destiny account. | |
| − | + | [[File:4.22.jpg|1000px|center|thumb]] | |
'''Steps to merge:''' | '''Steps to merge:''' | ||
| − | |||
# Select Account | # Select Account | ||
# Select the values wishing to keep (include the Account) | # Select the values wishing to keep (include the Account) | ||
# Select the Related info to keep in the selected Master Account | # Select the Related info to keep in the selected Master Account | ||
| − | # After this, press | + | # After this, press the Merge button to start the process |
# Users can use the option Delete After Merge to remove the account with the remaining related data | # Users can use the option Delete After Merge to remove the account with the remaining related data | ||
| − | =How to create an Account | + | =How to create an Account= |
| − | + | There are two ways to create Accounts: | |
| + | * Lead conversation through a "Closed Won" opportunity: Most often, when an Opportunity is closed as won, the lead itself transforms and becomes an account. | ||
| + | * Manual entry: When we get an RPH for a specific business with more than one location, each location requires a separate quote (and Account) created manually. In some cases, creating a parent account with a child for each property is the only way to relate them | ||
| − | * | + | The system has two ways to create Accounts manually: |
| − | * | + | *From the Account menu, under the "New Account" button |
| + | *And from the "Create Account" button available from the "View Account" button on the Account module. | ||
| − | + | Both ways require filling the same form, and the process is explained in detail below. | |
| − | + | = information contained within an Account= | |
| − | + | The user can find information unique to each Account in tabs across the top of the page. | |
| − | |||
| − | |||
| − | |||
| − | = | ||
| − | The | ||
These Tabs are: | These Tabs are: | ||
| Line 143: | Line 138: | ||
*Opportunities | *Opportunities | ||
*External Proposals | *External Proposals | ||
| − | *Reported | + | *Reported PH's |
*Event & Activities | *Event & Activities | ||
*Documents | *Documents | ||
*History | *History | ||
*Work History | *Work History | ||
| − | *Payments (only for Account type | + | *Payments (only for Account type "Child") |
==Account== | ==Account== | ||
| − | This tab contains basic information about the Account | + | This tab contains basic information about the Account, separated into subsections for better sorting of the information. Note that this information is the same that needs to be filled in the "New Account Form" when creating a new Account. |
===Account Information=== | ===Account Information=== | ||
| − | |||
* Owner: the name of the account manager | * Owner: the name of the account manager | ||
| − | * Company/Site: this name must be unique. After the user | + | * Company/Site: this name must be unique. After the user types the three first characters, the system will show you all similar names. |
* Management Company: the parent account. | * Management Company: the parent account. | ||
* Main Phone | * Main Phone | ||
| Line 167: | Line 161: | ||
* Email Domain | * Email Domain | ||
* Lead Source | * Lead Source | ||
| − | * Main Contact: If working with a Child account, only the contacts | + | * Main Contact: If the user is working with a Child account, he can select only the parent's contacts. It does not exist, and the user must add it previously. |
| − | * Acc Payable: is the contact of the person in charge of processing payments on the client side ( | + | * Acc Payable: is the contact of the person in charge of processing payments on the client's side (the one who commissions the work). |
* Where Obtained | * Where Obtained | ||
| − | * Self Managed (Checkbox): defines that the account is Self Managed, | + | * Self Managed (Checkbox): defines that the account is Self Managed; therefore, it does not have Parent Account. |
| − | * Major Player (Checkbox): defines if is a big account. | + | * Major Player (Checkbox): defines if it is a big account. |
| − | * Payment Terms: used to calculate the Invoice Due Date. | + | * Payment Terms: used to calculate the Invoice Due Date. The customer will be charged with penalties if the invoice is unpaid before the Due Date. |
* Account Description | * Account Description | ||
====Compliance Vendor==== | ====Compliance Vendor==== | ||
| − | A special fee has to be paid to the government when Pothole Repair creates invoices for certain companies. | + | A special fee has to be paid to the government when Pothole Repair creates invoices for certain companies. To fulfill this requirement, the system allows the user to set up the account to select the Compliance Vendor (the existing agreement), define the Vendor ID, add process-related notes and fees. |
| − | + | For example, suppose Pothole repair must pay 5% of an invoice to the government. In that case, the company can automatically add that amount to the customer invoice by setting a "Fee value" and a "Fee type." Furthermore, it is possible to select the ranges of dates in which the extra fee is applicable. | |
| − | |||
| − | |||
| + | '''The fields to set up this process are:''' | ||
* Compliance Vendor: this is a dropdown list where users can choose from the vendor that applies for the account. | * Compliance Vendor: this is a dropdown list where users can choose from the vendor that applies for the account. | ||
* Vendor ID: See explanation below. | * Vendor ID: See explanation below. | ||
| Line 190: | Line 183: | ||
===Address Information=== | ===Address Information=== | ||
| − | Accounts have address validation through Google Maps. The address information section has a | + | Accounts have address validation through Google Maps. The address information section has a "Validate Address" button to get the correct street and map coordinates (latitude and longitude values). States and Cities brackets are connected, and each one has a search field to identify the values of states or cities quickly. |
* State | * State | ||
| Line 196: | Line 189: | ||
* Street | * Street | ||
| − | When validating an address, the system | + | When validating an address, the system ensures no other account or lead exists with the same address as the one added. If that happens, the system will show a notification and will not validate the address. |
===Billing Address Information=== | ===Billing Address Information=== | ||
| − | Just like the section before, the validation through Google Maps is also available. The only difference here is the information on these fields | + | Just like the section before, the validation through Google Maps is also available. The only difference here is the systems will use the information on these fields to create the invoices. |
| − | Usually the information is taken from the Billing Address | + | Usually, the information is taken from the Billing Address information in the Parent Account but can be modified if the Children account requires it. |
Fields are: | Fields are: | ||
| Line 207: | Line 200: | ||
* Apartment | * Apartment | ||
* Bill Box Number or PO: defines the PO number in case an invoice or something else needs to be sent by mail. | * Bill Box Number or PO: defines the PO number in case an invoice or something else needs to be sent by mail. | ||
| − | * Electronic Email Bill: defines an email address to where the invoice | + | * Electronic Email Bill: defines an email address to where the user should send the invoice. |
| − | * Special Billing Instructions: | + | * Special Billing Instructions: When the job is completed, the user can add notes regarding special billing instructions. |
| + | |||
| + | |||
| + | ===Special Notes=== | ||
| + | This section helps the users to set specific notes when there are some special instructions on the given property. There are 4 note fields: | ||
| + | * Special Sales Instructions: This note will be specific for Sales. This can be added in the Mgmt Account and translated to the child accounts (if the user allow this). | ||
| + | * Special Surveyor Instructions: Instructions for surveyors. This note will be added automatically in the Survey task in the opportunity to do the inspection. | ||
| + | * Special Dispatch Instructions: Note for Dispatching. This note will be visible from the eTechnician App. | ||
| + | * Special Invoice Instructions: This note will appears in the invoice as a sticky note. | ||
==Map Location== | ==Map Location== | ||
| − | + | Using the Google Maps API, the user can see location coordinates and choose between map and satellite view (GMaps features). | |
| + | |||
| + | [[File:4.23.jpg|1000px|center|thumb]] | ||
| + | |||
| + | With this tool you can define the work area in the property, to avoid creating proposals in adjoining areas but outside of the propperty borders. The area defined on a property will be used to help detect potholes that fall within those boundaries (survey generation - Proposal Maker app) and to add additional repairs from the eTechnician app. Also, property border information will be available in the opportunity module on map location tab, with all potholes detected on the given property. | ||
| + | To define the property area, use the Draw a shape button. | ||
| + | |||
| + | [[File:Maps1.png|1000px|center|thumb|Draw a Shape]] | ||
| + | |||
| − | + | [[File:Maps2.png|1000px|center|thumb|Area draw]] | |
==Child Account== | ==Child Account== | ||
| − | From this section users can access and manage all the information regarding the child accounts | + | From this section, users can access and manage all the information regarding the child accounts or existent leads related to the parent account, if there were any. |
| − | The system will | + | The system will list all child accounts linked to the Parent Account and sort them in the same manner as the "View Accounts" link found in the Accounts tab at the top of the page. |
| − | + | [[File:4.24.jpg|1000px|center|thumb]] | |
| − | Information | + | Information found in this tab is: |
* Child account name | * Child account name | ||
| − | * Open Quotes: if the child account has any open quote, a green | + | * Open Quotes: if the child account has any open quote, a green money icon will be shown |
| − | * Main contact: | + | * Main contact: primary contact of the child account |
* Address | * Address | ||
* Región | * Región | ||
* PARC agreement: indicates if there is any [[PARC|PARC Agreement]] with the child account | * PARC agreement: indicates if there is any [[PARC|PARC Agreement]] with the child account | ||
| − | * Last activity: any kind of action triggered on the object | + | * Last activity: The last (any kind of) action triggered on the object |
* Owner | * Owner | ||
* Creation date | * Creation date | ||
| − | |||
Also, there is a column “options” with shortcuts to perform actions such as: | Also, there is a column “options” with shortcuts to perform actions such as: | ||
| Line 243: | Line 251: | ||
*[[Action_Tabs#Add_task|Add Task]] | *[[Action_Tabs#Add_task|Add Task]] | ||
| − | + | The same set of [[Action_Tabs|Action Tabs]] is available in most of the sections in the CRM. | |
Additionally, data can be exported or copied as well to an external source. | Additionally, data can be exported or copied as well to an external source. | ||
===Change Main Contact=== | ===Change Main Contact=== | ||
| − | + | Since editing the main contact will trigger the account protection and change its owner, this important feature allows the user to change the main contact for all the child accounts listed. | |
| − | When the user clicks on the button, instantly the column of | + | When the user clicks on the button, instantly, the column of "Main Contacts" is modified, and each record enables a dropdown list so that the user can modify the main contact for every single child account. |
| − | [[File:4.04.jpg| | + | [[File:4.04.jpg|1000px|center|thumb]] |
==Contacts== | ==Contacts== | ||
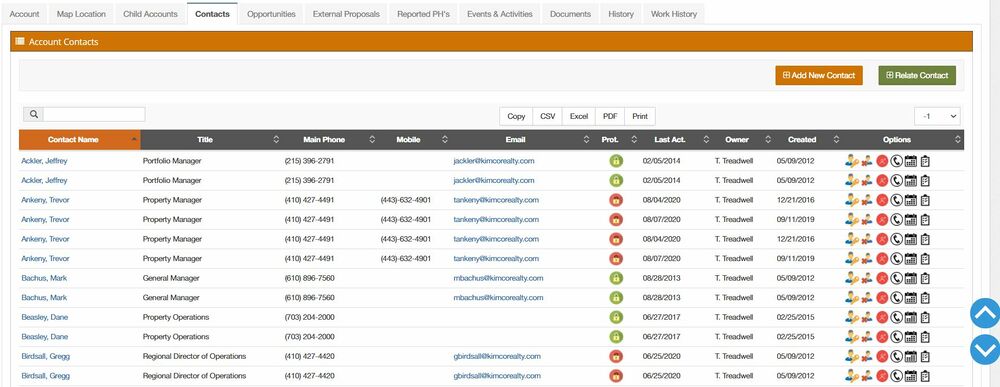
| − | + | Users can find the contacts list for the account, access detailed information about each contact for the account, and manage it through different actions. | |
| − | |||
| − | + | [[File:4.25.jpg|1000px|center|thumb]] | |
===Add New Contact=== | ===Add New Contact=== | ||
| − | This action will redirect to a form with the following sections | + | This action will redirect to a form with the following sections. |
* Principal Contact Information | * Principal Contact Information | ||
| Line 267: | Line 274: | ||
* Address information | * Address information | ||
| − | This is | + | This form is used in the [http://18.207.158.143:8080/index.php/Lead#Information_contained_in_a_Lead_-_New_Lead_Form Lead module] when adding a Lead for the very first time and is repeated throughout many other sections of the CRM |
===Relate Contact=== | ===Relate Contact=== | ||
| − | Relate contact: this action allows the user to link to the account any contact (previous creation) within the CRM. | + | [[File:4.26.jpg|100px|frameless]] Relate contact: this action allows the user to link to the account any contact (previous creation) within the CRM. |
| + | [[File:4.27.jpg|400px|right|frameless]] | ||
| − | + | This action will open a pop-up window showing the available contacts and related contacts, so the user can choose from either list and add contacts from one list to the other. | |
| − | + | For further information, visit the [[Contacts]] page | |
| − | |||
| − | For further information visit the Contacts page | ||
===Options=== | ===Options=== | ||
| − | |||
| − | |||
Furthermore, users can also perform specific actions for contact from the “options” column in this tab. These are: | Furthermore, users can also perform specific actions for contact from the “options” column in this tab. These are: | ||
| + | [[File:4.28.jpg|300px|right|thumb]] | ||
* Set main contact: this will instantly set the selected contact as the main contact for the account | * Set main contact: this will instantly set the selected contact as the main contact for the account | ||
* Remove contact account: this will instantly remove the contact from the account | * Remove contact account: this will instantly remove the contact from the account | ||
| Line 290: | Line 295: | ||
*[[Action_Tabs#Add_note|Add Note]] | *[[Action_Tabs#Add_note|Add Note]] | ||
| − | For further information visit the [[Contacts]] page. | + | For further information, visit the [[Contacts]] page. |
==Opportunities== | ==Opportunities== | ||
| − | + | This tab displays and provides access to all Opportunities related to the Account, including those related to parent and child accounts. Remember, Accounts (both Child and Parent Accounts) may have multiple active Opportunities, while a Lead, by definition, may only have one. | |
| − | |||
| − | |||
| − | + | [[File:4.05.jpg|1000px|frameless|centre|]] | |
The fields available on this tab are: | The fields available on this tab are: | ||
| − | * Opportunity name: works as a hyperlink to open the | + | * Opportunity name: works as a hyperlink to open the Opportunity. Will always be the concatenation of the name of the account and the date created |
| − | * Contact: Main contact of the account that holds the | + | * Contact: Main contact of the account that holds the Opportunity |
* Requested date | * Requested date | ||
| − | * Valid until | + | * Valid until the due date of the Opportunity |
* Closing Date | * Closing Date | ||
* Quotes: informs the status of the Quote | * Quotes: informs the status of the Quote | ||
| − | * TRs: | + | * TRs: the number of items that the Opportunity has inside |
* Amount | * Amount | ||
* Stage | * Stage | ||
| Line 322: | Line 325: | ||
*[[Action_Tabs#Add_task|Add Task]] | *[[Action_Tabs#Add_task|Add Task]] | ||
| − | For further information visit the [[Opportunity]] page. | + | For further information, visit the [[Opportunity]] page. |
==External Proposals== | ==External Proposals== | ||
| − | |||
| − | + | ===What's an external proposal?=== | |
| + | |||
| + | To provide excellent service, we have built strategic partnerships with companies that offer related services outside our scope, such as paving, concrete, line striping, seal coating, etc. | ||
| + | |||
| + | We call this service an "External Proposal," a referral to one of our strategic partners to provide any of those services. | ||
| + | |||
| + | There are four possible scenarios: | ||
| + | # Pothole Repairs goes out to inspect their property, and if they have one or more potholes, we will create an opportunity and send them a quote, hoping we get the work. | ||
| + | # It is also possible that in addition to the work above, they also have a broken sidewalk, or the stripes aren't complete, or maybe they have a giant pothole (outside our expertise). In this case, we include a strategic partner to assist us with the job. | ||
| + | # In another case, one of our inspectors might visit a property and note damage (out of our scope) that only a strategic partner can do. | ||
| + | # A final scenario is where our inspector goes out to the lot, and everything is in excellent condition- there is no work for us or our partners to do since everything is in good condition. This scenario is possible only as part of a PARC agreement visit during a property check. | ||
| + | |||
| + | At Pothole Repairs, we ensure high-quality service by resolving our customers' issues by taking responsibility and having the damage fixed by one of our partners or us. | ||
| − | The information will | + | ===How to create an external proposal=== |
| + | |||
| + | There are two ways to create an external proposal: | ||
| + | |||
| + | # Our field inspectors can use the mobile app to either enter details about a pothole or out-of-scope damage. Then, an email is sent to the partner and the client explaining the situation and reason to call someone else to do the job. | ||
| + | |||
| + | # The other way to create an external proposal is manual creation. When a customer calls explaining they need a repair classified "out of scope," the user can create the external proposal. Until the user completes all the information in the system and everybody knows their role, no automated emails are triggered. | ||
| + | |||
| + | The user can visualize all External proposals related to the Account on this tab or create a new External Proposal and link it to the Account by clicking on the "Add External Proposal" button. The user can access the External Proposal from this list by clicking on the Proposal # as well. | ||
| + | |||
| + | The user will visualize the information in the following columns: | ||
* Proposal # | * Proposal # | ||
| Line 338: | Line 362: | ||
* Options | * Options | ||
| − | + | All the External proposals for a Parent account and related children accounts will be listed too. | |
| − | |||
| − | |||
==Reported PH’s== | ==Reported PH’s== | ||
| − | + | It shows the list of all the RPH's linked to the Account and allows the user to quickly work with the records using the functions available on the column "Options." | |
A Child Account can have only one RPH active at the same time. | A Child Account can have only one RPH active at the same time. | ||
| − | + | [[File:4.06.jpg|1000px|centre|thumb]] | |
| − | + | For a Parent account, all the RPHs that belong to the children accounts will be listed. | |
| − | + | [[File:4.07.jpg|1000px|centre|thumb]] | |
The visible columns of info are: | The visible columns of info are: | ||
* Account/Lead: if the account is a parent account, all the children accounts that have RPHs related will be shown. | * Account/Lead: if the account is a parent account, all the children accounts that have RPHs related will be shown. | ||
| − | * Rel Opp: | + | * Rel Opp: The system will display the name of the existing opportunity related to the RPH and work as a hyperlink. |
* Status: RPH status | * Status: RPH status | ||
* Created by | * Created by | ||
| Line 365: | Line 387: | ||
* Where Obt | * Where Obt | ||
| − | + | The column named Options works as a shortcut to manage the RPH, with buttons such as: | |
* View Damage Info | * View Damage Info | ||
| Line 378: | Line 400: | ||
==Event & Activities== | ==Event & Activities== | ||
| − | This tab shows the Notes, | + | This tab shows the Notes, Calls, Emails, or Tasks related to the Accounts. The main purpose is to keep the communication flowing with the customer by logging all the activities. |
| − | If the user is working with a Child account, only the events and activities related to that account will be listed | + | If the user is working with a Child account, only the events and activities related to that account will be listed. When working with a Parent account, the system will show all the events and activities related to all children accounts. |
| − | Objects | + | Objects seen on this tab are: |
* Open Tasks | * Open Tasks | ||
* Closed Tasks | * Closed Tasks | ||
| Line 390: | Line 412: | ||
* Notes | * Notes | ||
| − | + | [[File:4.08.jpg|1000px|centre|thumb]] | |
==Documents== | ==Documents== | ||
| − | + | The Documents tab is where you can upload and access documents related to the Account. You will also find helpful documents shared by all Accounts, such as our W9 and COI Request Form. | |
| − | + | [[File:4.09.jpg|1000px|centre|thumb]] | |
| − | |||
| − | |||
| − | |||
| − | |||
==History== | ==History== | ||
| − | + | The system keeps a record of all the activities done on an Account. Any modification or information added/attached is logged and shown in chronological order on this tab. | |
| − | + | [[File:4.10.jpg|1000px|center|frameless]] | |
The user can see this in a list with the following columns: | The user can see this in a list with the following columns: | ||
* Modified Date: date and time of the log | * Modified Date: date and time of the log | ||
* Type: event that triggered the log | * Type: event that triggered the log | ||
| − | * Owner: owner of the | + | * Owner: owner of the lead |
| − | * Modified by | + | * Modified by the user that performed the activity that triggered the log |
==Work History== | ==Work History== | ||
| − | Keeps a record of all the Works done for the account | + | Keeps a record of all the Works done for the account, such as opportunity creation, Opportunity closed, dispatch created, invoice created, among others. |
| − | + | [[File:4.11.jpg|1000px|centre|thumb]] | |
The information that can be found on the screen is: | The information that can be found on the screen is: | ||
| Line 423: | Line 441: | ||
* Location | * Location | ||
* Amount/TR | * Amount/TR | ||
| − | * Dispatch | + | * Dispatch NRO |
* Dispatch Type | * Dispatch Type | ||
* Tech Lead | * Tech Lead | ||
| Line 429: | Line 447: | ||
* Invoice no | * Invoice no | ||
| − | ==Payments (only for | + | ==Payments (only for "child account type")== |
| − | + | The function is used when a customer overpays an invoice or makes a payment without any invoice. Pothole Repair needs to register that the customer has credit available to be used in future work. | |
| − | If the customer has a payment created | + | If the customer has a payment created on the next invoice generation, the system will detect it and reduce it directly from the invoice. |
| − | + | [[File:415.jpg|1000px|centre|thumb]] | |
| − | |||
| − | It is possible to quickly register a payment on the child account | + | ===Create New Payment=== |
| + | [[File:414.jpg|600px|center]] | ||
| + | It is possible to quickly register a payment on the child account using the shortcut: | ||
| + | [[File:416.jpg|frameless]]. | ||
| − | + | The system will show a form where the user needs to enter the information and save the work; then, the payment will be automatically associated with the account. | |
| − | =Actions available working on Accounts = | + | =Actions that are available working on Accounts = |
==Common Action== | ==Common Action== | ||
| Line 455: | Line 475: | ||
==Available actions - Accounts Module:== | ==Available actions - Accounts Module:== | ||
| − | ===Create Opportunity | + | ===Create Opportunity=== |
| + | [[File:412.jpg|frameless]] This shortcut enables the user to create an opportunity related to the account quickly. The only constraint is it will not be possible to create an opportunity if an open RPH is not related to the account. | ||
| + | |||
| + | ===Add Child=== | ||
| + | [[File:417.jpg|frameless]] This is a shortcut to create a new account related to the account in which the user is currently working. | ||
| + | |||
| + | The system will guide the user to the form explained in the section [[Accounts#How_to_create_an_Account.3F| "How to create an account"]]. | ||
| + | |||
| + | |||
| + | ===PARC Agreement=== | ||
| + | |||
| + | PARC stands for Preferred Asphalt Repair Contract | ||
| − | This | + | A PARC agreement is a service contract. This agreement provides a discount for any repairs needed within a year, and during that year, we will come to the client's property and inspect the lot three times. For each visit, we will provide a report with recommendations. The client is not obligated to carry on with any of those damages. |
| − | ===PARC Proposal | + | If the client has a PARC agreement and authorizes the repairs, they get an additional 10% discount on any work they choose or authorize during the year that the PARC agreement is in effect. Plus, the PARC agreement extends the warranty from 12 to 15 months. |
| − | + | ||
| − | Shortcut to create a PARC and associate it to the account. The process will simulate a proposal, dispatch, and invoice process creation, but the only Item on all the | + | Though Pothole Repairs is in charge of visit scheduling throughout the year, the client has the freedom to call us if they consider it necessary. |
| + | |||
| + | [[File:0001.jpg|500px|thumb|center|PARC Flyer]] | ||
| + | |||
| + | ====PARC Proposal==== | ||
| + | [[File:413.jpg|frameless]] Shortcut to create a PARC and associate it to the account. The process will simulate a proposal, dispatch, and invoice process creation, but the only Item on all the operations will be a PARC item. | ||
| − | If a PARC already exists for the account, the system will validate | + | If a PARC already exists for the account, the system will validate it and not allow a new PARC creation. |
| − | |||
| − | |||
| − | + | ====PARC Options==== | |
| + | [[File:418.jpg|frameless]] This feature is only available for users with Admin roles. It is a feature that enables you to either modify the active PARC agreement or delete it. | ||
| − | + | If deleted, the system will automatically remove the dates and pending events triggered by and related to the PARC. | |
| − | + | [[File:419.jpg|900px|center|frameless]] | |
| − | + | =Quick Access= | |
| − | + | *[[RPH]] | |
| + | *[[Lead]] | ||
| + | *[[Contacts]] | ||
| + | *[[Opportunity]] | ||
| + | *[[Dispatch]] | ||
| + | *[[Invoices and Payroll]] | ||
| + | *[[External Portals]] | ||
| + | *[[Mobile_applications|Mobile applications]] | ||
| + | *[[Back-end Processes]] | ||
Latest revision as of 12:25, 26 September 2022
What is an Account?
Accounts contain complete customer information generated while creating an RPH and a Lead during the sales process.
When someone accesses an account, they will notice it contains information about the specific site, the human, and the property management company and a record of all the calls, emails, events, and activities of a customer.
Let us remember something we explained in the Lead Module that might help us to understand better what an Account is:
What's a child account, and how does it work?
There are two primary types of accounts in our system: parent and child accounts. These accounts look identical, have the same features, but possess different functions.
For instance, UPS is a package delivery company, and they have many branches across the country, making "UPS Global" a parent account.
In most cases, a parent account's primary purpose is to hold data of all related sites in one central location. When a user accesses a UPS parent account, they can see all the contacts, related business activities, external proposals, documents, and more, for every UPS site. In other words, this parent account compresses all the information related to the branches (children) and the headquarters (parent) of the same company.
When the user accesses a child account, they will find the same information but for one specific location only.
Another type of parent account called the "self-managed" account is the universal parent account that contains all those smaller accounts without a logical parent account.
Account protection
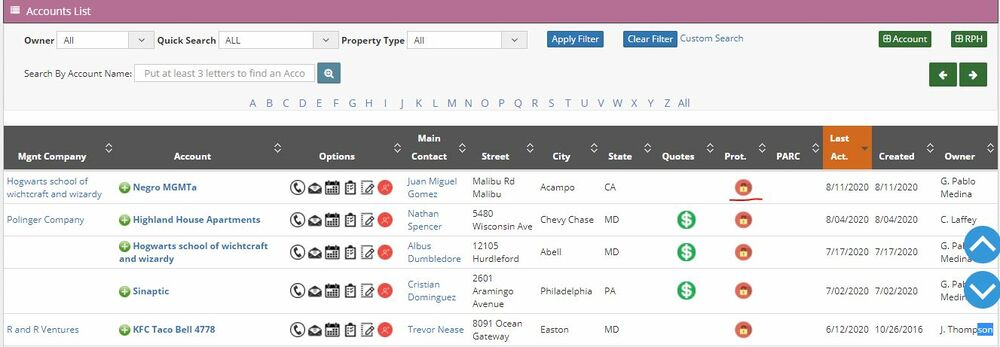
To avoid a situation where multiple Account Managers manage a single Contact, we have installed a protection feature. For the column labeled "Prot", a green padlock indicates an unprotected contact, and a red padlock indicates that an Account Manager protects it.
The addition of contact related to a Lead or an Account always triggers the Protection.
Only the Account Manager responsible for the account holds editing permission during the protection period. Those users who do not have special permissions to edit a contact's data will only keep read-only permissions. Once the time is up and the contact is unprotected, all users can see and edit their information.
In rare cases, an account may have shared ownership. For example, a technician unknowingly creates an RPH on an already existing account. When he loads the RPH, the system allows him to have part of that property- he would not be the true owner of said account but would have the permission to edit it.
Account and contacts
When a user modifies an account's contact information, the system automatically changes the account's status to protected so that no one can modify it except the new owner. At the same time, the system protects that account and all those related to said contact.
If a user with sufficient permissions to modify an already protected account makes any modification, the system will restart the protection period for such an account.
The contact is the critical link that generates the relationships within the system.
Accounts Menu
New Accounts
This option takes the user to the "New Account" form. For more details on creating a New Account, please redirect to the section in this document "How to create an Account"
View Accounts
The system allows the user to list and view all the existing Accounts on the platform and quickly identify whether it is a child or parent account. All parent account rows are highlighted in yellow.
The user can view the list of the existing accounts in the database, filtered by specific parameters using the search bar and looking among the shown results.
Filters available are:
- Bulleted list item
- Owner: filter by the owner of the Account
- Quick Search: filter by a predefined range of time
- Property type
It is also possible to activate the "Custom Search" that will enable more fields of filtering, such as:
- From date (creation)
- To date (creation)
Once the filter is complete, the system will display the results in a list. The user can further refine the results by writing on the "Search" field (magnifying glass) and verifying if there are matches with any field.
On the bar above at the right, there are two buttons available that work as a shortcut:
- +Account: quick account creation form access
- +RPH: quick RPH creation form access
The results can be extracted and downloaded to the local disk in different formats such as CSV, Excel, PDF, or directly printed or copied to the clipboard.
Information shown in this columns:
- Management Company: the Parent account of the shown account.
- Account: work as a shortcut to access the account.
- Main Contact: is the primary contact of the account.
- Street: account address
- City: account city
- State: account state
- Quotes: indicates whether there are quotes for the account. If yes, the money icon displays in green.
- Prot.: indicates if the account is protected or not.
- PARC: indicates if there is any PARC Agreement with that account, and what is the status (enabled or expired).
- Last Act.: last activity within/related to the account
- Created: date of account creation
- Owner: owner of the account who protects the account at the moment.
From this list there is also access to the column “Options”, with more buttons that work as shortcuts to:
Merge Accounts
This module allows the user to merge and delete accounts.
When merging an account, the system will move all the related info to the selected destination account and delete the merged account. The system follows the same process to delete an account, but there is no need to select a destiny account.
There are ten sections in the form to merge accounts:
- Account Info
- Child Account Info
- Contact Info
- Opportunity Info
- Events
- Tasks Info
- Notes info
- Emails Info
- Calls info
- Documents Info
These sections make it easier to select and edit the information the user wants to merge. These optional sections can be either hidden or shown. Only the first section "Account Information" contains mandatory fields, the minimum information that will be transferred (merged) to the destiny account.
Steps to merge:
- Select Account
- Select the values wishing to keep (include the Account)
- Select the Related info to keep in the selected Master Account
- After this, press the Merge button to start the process
- Users can use the option Delete After Merge to remove the account with the remaining related data
How to create an Account
There are two ways to create Accounts:
- Lead conversation through a "Closed Won" opportunity: Most often, when an Opportunity is closed as won, the lead itself transforms and becomes an account.
- Manual entry: When we get an RPH for a specific business with more than one location, each location requires a separate quote (and Account) created manually. In some cases, creating a parent account with a child for each property is the only way to relate them
The system has two ways to create Accounts manually:
- From the Account menu, under the "New Account" button
- And from the "Create Account" button available from the "View Account" button on the Account module.
Both ways require filling the same form, and the process is explained in detail below.
information contained within an Account
The user can find information unique to each Account in tabs across the top of the page.
These Tabs are:
- Account
- Map Location
- Child Account
- Contacts
- Opportunities
- External Proposals
- Reported PH's
- Event & Activities
- Documents
- History
- Work History
- Payments (only for Account type "Child")
Account
This tab contains basic information about the Account, separated into subsections for better sorting of the information. Note that this information is the same that needs to be filled in the "New Account Form" when creating a new Account.
Account Information
- Owner: the name of the account manager
- Company/Site: this name must be unique. After the user types the three first characters, the system will show you all similar names.
- Management Company: the parent account.
- Main Phone
- Fax
- Property Type
- Región
- Website
- Email Domain
- Lead Source
- Main Contact: If the user is working with a Child account, he can select only the parent's contacts. It does not exist, and the user must add it previously.
- Acc Payable: is the contact of the person in charge of processing payments on the client's side (the one who commissions the work).
- Where Obtained
- Self Managed (Checkbox): defines that the account is Self Managed; therefore, it does not have Parent Account.
- Major Player (Checkbox): defines if it is a big account.
- Payment Terms: used to calculate the Invoice Due Date. The customer will be charged with penalties if the invoice is unpaid before the Due Date.
- Account Description
Compliance Vendor
A special fee has to be paid to the government when Pothole Repair creates invoices for certain companies. To fulfill this requirement, the system allows the user to set up the account to select the Compliance Vendor (the existing agreement), define the Vendor ID, add process-related notes and fees.
For example, suppose Pothole repair must pay 5% of an invoice to the government. In that case, the company can automatically add that amount to the customer invoice by setting a "Fee value" and a "Fee type." Furthermore, it is possible to select the ranges of dates in which the extra fee is applicable.
The fields to set up this process are:
- Compliance Vendor: this is a dropdown list where users can choose from the vendor that applies for the account.
- Vendor ID: See explanation below.
- Compliance Vendor Notes
- Fee Value: according to compliance vendor
- Fee Type: according to compliance vendor
- Start Date/End Date
Address Information
Accounts have address validation through Google Maps. The address information section has a "Validate Address" button to get the correct street and map coordinates (latitude and longitude values). States and Cities brackets are connected, and each one has a search field to identify the values of states or cities quickly.
- State
- City
- Street
When validating an address, the system ensures no other account or lead exists with the same address as the one added. If that happens, the system will show a notification and will not validate the address.
Billing Address Information
Just like the section before, the validation through Google Maps is also available. The only difference here is the systems will use the information on these fields to create the invoices.
Usually, the information is taken from the Billing Address information in the Parent Account but can be modified if the Children account requires it.
Fields are:
- Suite
- Apartment
- Bill Box Number or PO: defines the PO number in case an invoice or something else needs to be sent by mail.
- Electronic Email Bill: defines an email address to where the user should send the invoice.
- Special Billing Instructions: When the job is completed, the user can add notes regarding special billing instructions.
Special Notes
This section helps the users to set specific notes when there are some special instructions on the given property. There are 4 note fields:
- Special Sales Instructions: This note will be specific for Sales. This can be added in the Mgmt Account and translated to the child accounts (if the user allow this).
- Special Surveyor Instructions: Instructions for surveyors. This note will be added automatically in the Survey task in the opportunity to do the inspection.
- Special Dispatch Instructions: Note for Dispatching. This note will be visible from the eTechnician App.
- Special Invoice Instructions: This note will appears in the invoice as a sticky note.
Map Location
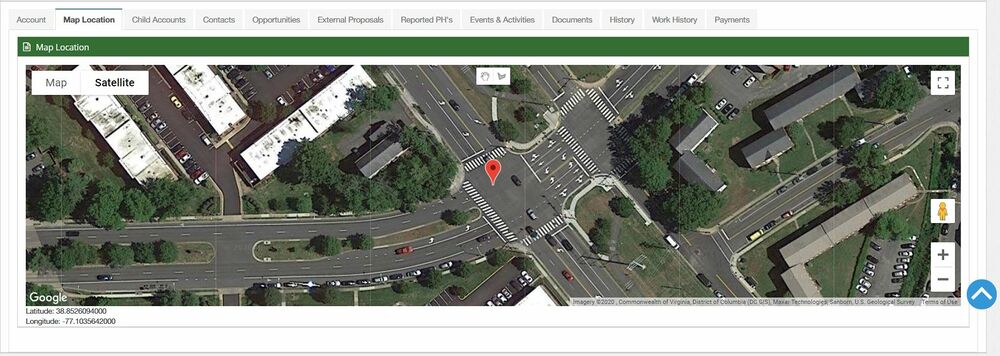
Using the Google Maps API, the user can see location coordinates and choose between map and satellite view (GMaps features).
With this tool you can define the work area in the property, to avoid creating proposals in adjoining areas but outside of the propperty borders. The area defined on a property will be used to help detect potholes that fall within those boundaries (survey generation - Proposal Maker app) and to add additional repairs from the eTechnician app. Also, property border information will be available in the opportunity module on map location tab, with all potholes detected on the given property. To define the property area, use the Draw a shape button.
Child Account
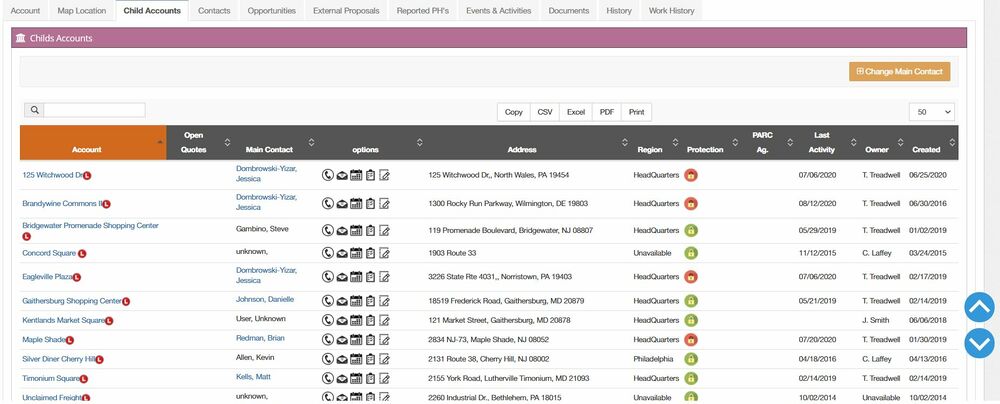
From this section, users can access and manage all the information regarding the child accounts or existent leads related to the parent account, if there were any.
The system will list all child accounts linked to the Parent Account and sort them in the same manner as the "View Accounts" link found in the Accounts tab at the top of the page.
Information found in this tab is:
- Child account name
- Open Quotes: if the child account has any open quote, a green money icon will be shown
- Main contact: primary contact of the child account
- Address
- Región
- PARC agreement: indicates if there is any PARC Agreement with the child account
- Last activity: The last (any kind of) action triggered on the object
- Owner
- Creation date
Also, there is a column “options” with shortcuts to perform actions such as:
The same set of Action Tabs is available in most of the sections in the CRM.
Additionally, data can be exported or copied as well to an external source.
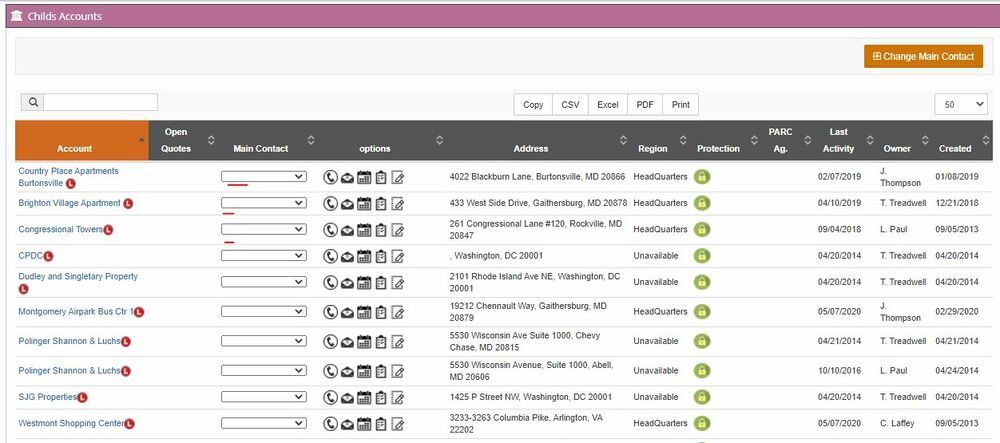
Change Main Contact
Since editing the main contact will trigger the account protection and change its owner, this important feature allows the user to change the main contact for all the child accounts listed.
When the user clicks on the button, instantly, the column of "Main Contacts" is modified, and each record enables a dropdown list so that the user can modify the main contact for every single child account.
Contacts
Users can find the contacts list for the account, access detailed information about each contact for the account, and manage it through different actions.
Add New Contact
This action will redirect to a form with the following sections.
- Principal Contact Information
- Contact Description
- Address information
This form is used in the Lead module when adding a Lead for the very first time and is repeated throughout many other sections of the CRM
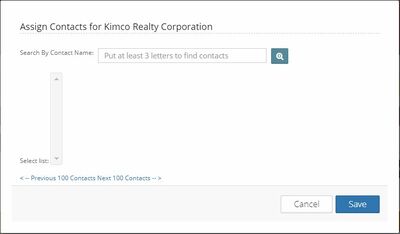
Relate Contact
![]() Relate contact: this action allows the user to link to the account any contact (previous creation) within the CRM.
Relate contact: this action allows the user to link to the account any contact (previous creation) within the CRM.
This action will open a pop-up window showing the available contacts and related contacts, so the user can choose from either list and add contacts from one list to the other.
For further information, visit the Contacts page
Options
Furthermore, users can also perform specific actions for contact from the “options” column in this tab. These are:
- Set main contact: this will instantly set the selected contact as the main contact for the account
- Remove contact account: this will instantly remove the contact from the account
- Add Call
- Add Event
- Add Note
For further information, visit the Contacts page.
Opportunities
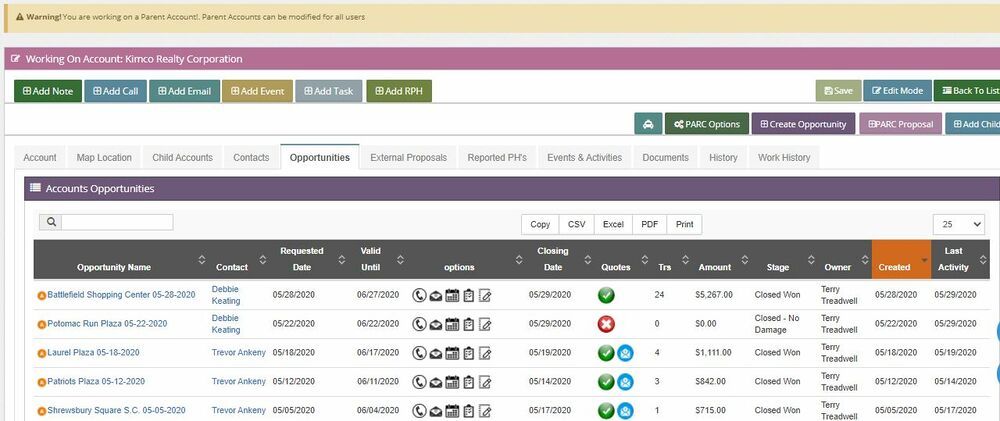
This tab displays and provides access to all Opportunities related to the Account, including those related to parent and child accounts. Remember, Accounts (both Child and Parent Accounts) may have multiple active Opportunities, while a Lead, by definition, may only have one.
The fields available on this tab are:
- Opportunity name: works as a hyperlink to open the Opportunity. Will always be the concatenation of the name of the account and the date created
- Contact: Main contact of the account that holds the Opportunity
- Requested date
- Valid until the due date of the Opportunity
- Closing Date
- Quotes: informs the status of the Quote
- TRs: the number of items that the Opportunity has inside
- Amount
- Stage
- Owner
- Created
- Last activity
Also, there is a column “options” with shortcuts to perform actions such as:
For further information, visit the Opportunity page.
External Proposals
What's an external proposal?
To provide excellent service, we have built strategic partnerships with companies that offer related services outside our scope, such as paving, concrete, line striping, seal coating, etc.
We call this service an "External Proposal," a referral to one of our strategic partners to provide any of those services.
There are four possible scenarios:
- Pothole Repairs goes out to inspect their property, and if they have one or more potholes, we will create an opportunity and send them a quote, hoping we get the work.
- It is also possible that in addition to the work above, they also have a broken sidewalk, or the stripes aren't complete, or maybe they have a giant pothole (outside our expertise). In this case, we include a strategic partner to assist us with the job.
- In another case, one of our inspectors might visit a property and note damage (out of our scope) that only a strategic partner can do.
- A final scenario is where our inspector goes out to the lot, and everything is in excellent condition- there is no work for us or our partners to do since everything is in good condition. This scenario is possible only as part of a PARC agreement visit during a property check.
At Pothole Repairs, we ensure high-quality service by resolving our customers' issues by taking responsibility and having the damage fixed by one of our partners or us.
How to create an external proposal
There are two ways to create an external proposal:
- Our field inspectors can use the mobile app to either enter details about a pothole or out-of-scope damage. Then, an email is sent to the partner and the client explaining the situation and reason to call someone else to do the job.
- The other way to create an external proposal is manual creation. When a customer calls explaining they need a repair classified "out of scope," the user can create the external proposal. Until the user completes all the information in the system and everybody knows their role, no automated emails are triggered.
The user can visualize all External proposals related to the Account on this tab or create a new External Proposal and link it to the Account by clicking on the "Add External Proposal" button. The user can access the External Proposal from this list by clicking on the Proposal # as well.
The user will visualize the information in the following columns:
- Proposal #
- Partner
- Created by
- Created (date)
- Status
- Options
All the External proposals for a Parent account and related children accounts will be listed too.
Reported PH’s
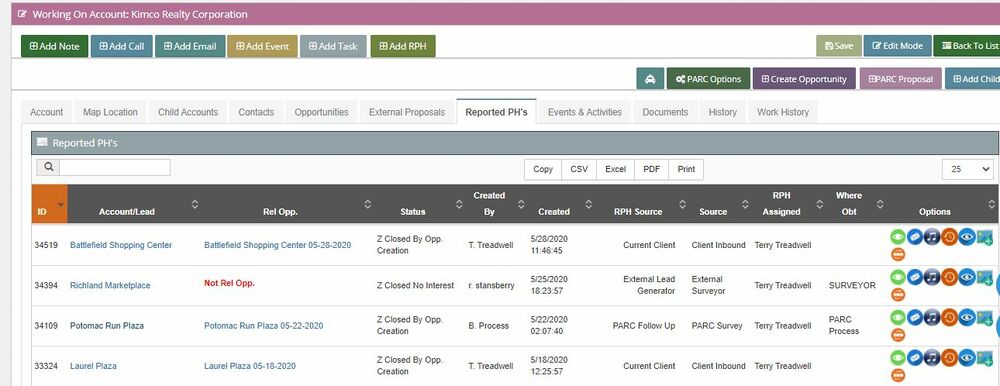
It shows the list of all the RPH's linked to the Account and allows the user to quickly work with the records using the functions available on the column "Options."
A Child Account can have only one RPH active at the same time.
For a Parent account, all the RPHs that belong to the children accounts will be listed.
The visible columns of info are:
- Account/Lead: if the account is a parent account, all the children accounts that have RPHs related will be shown.
- Rel Opp: The system will display the name of the existing opportunity related to the RPH and work as a hyperlink.
- Status: RPH status
- Created by
- Created
- RPH Source
- Source
- RPH Assigned
- Where Obt
The column named Options works as a shortcut to manage the RPH, with buttons such as:
- View Damage Info
- Send Email
- View Audio Files
- View History
- View RPH Images
- Add RPH Images
- Change RPH status
To see the function of each button, please visit the RPH page.
Event & Activities
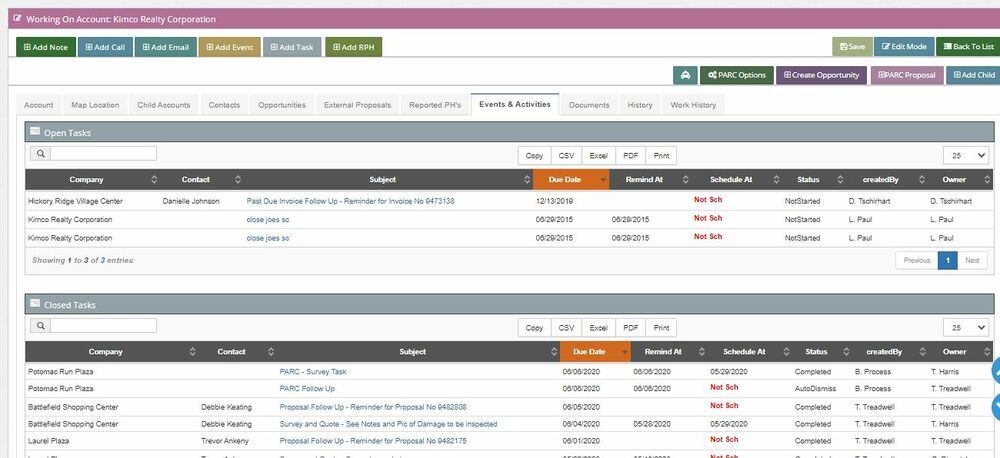
This tab shows the Notes, Calls, Emails, or Tasks related to the Accounts. The main purpose is to keep the communication flowing with the customer by logging all the activities.
If the user is working with a Child account, only the events and activities related to that account will be listed. When working with a Parent account, the system will show all the events and activities related to all children accounts.
Objects seen on this tab are:
- Open Tasks
- Closed Tasks
- Emails
- Calls
- Events
- Notes
Documents
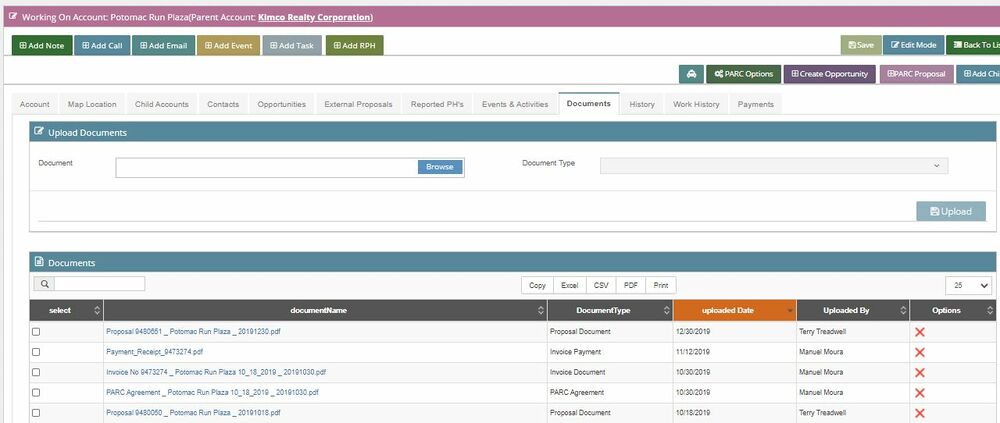
The Documents tab is where you can upload and access documents related to the Account. You will also find helpful documents shared by all Accounts, such as our W9 and COI Request Form.
History
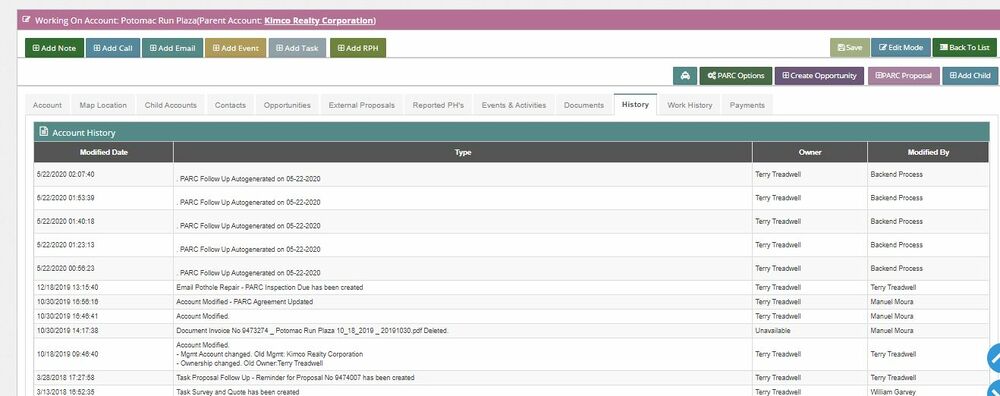
The system keeps a record of all the activities done on an Account. Any modification or information added/attached is logged and shown in chronological order on this tab.
The user can see this in a list with the following columns:
- Modified Date: date and time of the log
- Type: event that triggered the log
- Owner: owner of the lead
- Modified by the user that performed the activity that triggered the log
Work History
Keeps a record of all the Works done for the account, such as opportunity creation, Opportunity closed, dispatch created, invoice created, among others.
The information that can be found on the screen is:
- Opportunity Name
- Closing Date
- Location
- Amount/TR
- Dispatch NRO
- Dispatch Type
- Tech Lead
- Helpers
- Invoice no
Payments (only for "child account type")
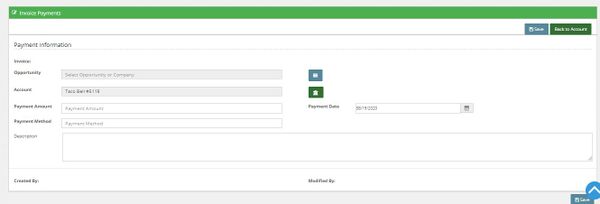
The function is used when a customer overpays an invoice or makes a payment without any invoice. Pothole Repair needs to register that the customer has credit available to be used in future work.
If the customer has a payment created on the next invoice generation, the system will detect it and reduce it directly from the invoice.
Create New Payment
It is possible to quickly register a payment on the child account using the shortcut:
![]() .
.
The system will show a form where the user needs to enter the information and save the work; then, the payment will be automatically associated with the account.
Actions that are available working on Accounts
Common Action
These are the actions common to most of the modules:
Available actions - Accounts Module:
Create Opportunity
![]() This shortcut enables the user to create an opportunity related to the account quickly. The only constraint is it will not be possible to create an opportunity if an open RPH is not related to the account.
This shortcut enables the user to create an opportunity related to the account quickly. The only constraint is it will not be possible to create an opportunity if an open RPH is not related to the account.
Add Child
![]() This is a shortcut to create a new account related to the account in which the user is currently working.
This is a shortcut to create a new account related to the account in which the user is currently working.
The system will guide the user to the form explained in the section "How to create an account".
PARC Agreement
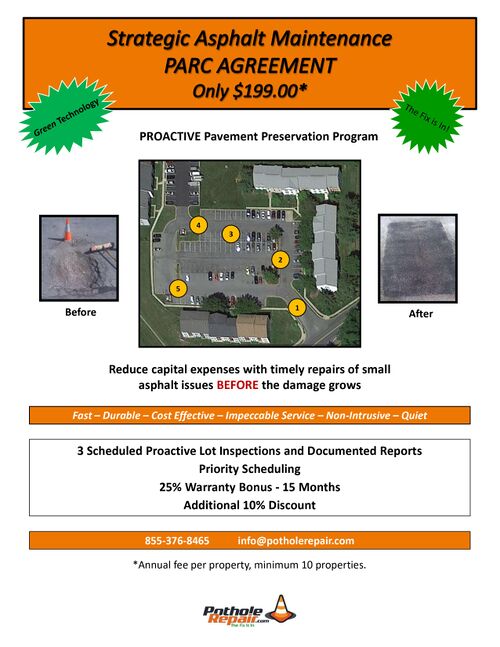
PARC stands for Preferred Asphalt Repair Contract
A PARC agreement is a service contract. This agreement provides a discount for any repairs needed within a year, and during that year, we will come to the client's property and inspect the lot three times. For each visit, we will provide a report with recommendations. The client is not obligated to carry on with any of those damages.
If the client has a PARC agreement and authorizes the repairs, they get an additional 10% discount on any work they choose or authorize during the year that the PARC agreement is in effect. Plus, the PARC agreement extends the warranty from 12 to 15 months.
Though Pothole Repairs is in charge of visit scheduling throughout the year, the client has the freedom to call us if they consider it necessary.
PARC Proposal
![]() Shortcut to create a PARC and associate it to the account. The process will simulate a proposal, dispatch, and invoice process creation, but the only Item on all the operations will be a PARC item.
Shortcut to create a PARC and associate it to the account. The process will simulate a proposal, dispatch, and invoice process creation, but the only Item on all the operations will be a PARC item.
If a PARC already exists for the account, the system will validate it and not allow a new PARC creation.
PARC Options
![]() This feature is only available for users with Admin roles. It is a feature that enables you to either modify the active PARC agreement or delete it.
This feature is only available for users with Admin roles. It is a feature that enables you to either modify the active PARC agreement or delete it.
If deleted, the system will automatically remove the dates and pending events triggered by and related to the PARC.
