Difference between revisions of "RPH"
| (111 intermediate revisions by 4 users not shown) | |||
| Line 1: | Line 1: | ||
| − | RPH | + | =What is an RPH?= |
| − | + | An RPH (Reported Pothole) is like a lite version of a lead from a business perspective. | |
| − | + | Earlier, every time that the company went out and found a pothole, the account managers could create a Lead for it but not capture the follow-up events such as: Did it become a sale or not? Is anyone interested in having us fix it? This process created a lot of duplicates and didn't allow the company to track the sales evolution. | |
| − | + | As a result, we decided to differentiate and create a sales process that fit our needs- to track every opportunity over time and connect seamlessly with our customers. | |
| − | |||
| − | + | An RPH is a '''reported pothole that exists right now at a site''' and forms the initial step in our process. We know where the pothole is, but we don't know whether it will turn into a Lead or not. Every reported pothole is recorded in our system, whether it is a Lead or an Account. | |
| − | = | + | =What is the difference between a Lead and an Account?= |
| − | + | Leads and Accounts share a lot of information, but the significant difference is whether we have done business with the customer or not. When a Lead has a quote, and the quote becomes a sale, the Lead automatically becomes an Account. | |
| − | = | + | =How is it generated, and when?= |
| − | + | There are several different ways in which RPHs are created. | |
| − | * | + | * Through '''external marketing companies''': With the help of their database and marketing campaigns, we can reach more people interested in hiring our services. |
| − | |||
| − | + | The external marketing company will use an [[External_Portals|external portal]] to create an RPH or Lead every time they get an answer from a potential customer. This action will generate the correspondent record in our system with their footprint and stamps to know the RPH/ Lead proceeds from their database(*). | |
| − | + | * Through '''manual entry''': This happens, for instance, when a customer calls us, sends an email, visits our website, etc. Typically, these situations require the user to generate the RPH manually. | |
| − | * | + | * Through '''mobile applications''': By far, our mobile applications create the largest number of records in the system. We hire independent contractors, assign them a territory, and give them a license. They are paid to go out, visit every parking lot they can find, and report the potholes in the mobile application. You can find these records in the system with the ''pothole hunter'' label. |
| − | |||
| − | |||
| − | |||
| + | (*) We need to know when we get a contact from an independent contractor so they can get paid and credited for it. In some cases, they might also respond to a past customer, follow the same process, and earn the same pay and credit. | ||
| − | + | == RPH creation through mobile application == | |
| + | There are two different [[mobile applications]] to create an RPH: | ||
| − | + | *Lead Generator used by ''Hunter'': Hunters are temporary independent contractors that generate RPHs. As explained earlier, they ''hunt'' potholes. | |
| + | *Proposal Maker used by ''Surveyors'': Surveyors are full-time employees who visit and inspect sites that have requested a quote. | ||
| + | Both mobile applications allow the user to quickly send the RPH information to the system by following a simple process. The [[Data Analysis Team]] processes the information and analyzes the likelihood of an RPH to become an [[opportunity]] successfully. | ||
| − | + | The Hunters and Surveyors must complete/upload at least the following information: | |
| + | *A photo of the reported pothole | ||
| + | *A leasing picture (a reference place to geolocate the pothole) | ||
| + | *Complete site information | ||
| − | + | Once the information is uploaded, they need to validate the address. The system triggers a whole validation process of the site database, searching for any existing [[accounts|account]] with the exact address/ location, through an integration with Google Maps with geolocation. | |
| − | + | If the site already exists in the database, then the system will inform the user about it and automatically link to that existing [[Lead]] or [[Accounts|Account]]. As the user finalizes RPH creation, the [[Data Analysis team]] will also need to validate it. | |
| − | + | If the site does not exist, then the RPH is created without a linked site, which may be added afterward based on the analysis results performed by the Data Analysis Team. One can quickly identify this event on the screen with the icon [[File:01.1.jpg|frameless]]. | |
| + | == Manual RPH creation (through CRM)== | ||
| − | + | In the scenario where a customer directly contacts us or requests for a pothole repair, the CRM allows us to create an RPH through a quick process manually. To create an RPH manually, the user needs to press the "[[File:Iconplus.jpg|frameless]]" icon on the top right corner of the menu section. | |
| + | [[File:101.jpg|1024px|frameless|center]] | ||
| − | + | This option shows a form with the following sections: | |
| − | + | [[File:102.jpg|thumb|right|RPH Creation Form]] | |
| − | *Owner | + | '''''General information''''' |
| + | *RPH status (Mandatory) | ||
| + | *Owner (Mandatory) | ||
*Assign to | *Assign to | ||
| − | + | *Company/Site (Mandatory) | |
| − | *Company/Site | + | *Property Type (Mandatory) |
| − | *Property Type | + | *RPH Source (Mandatory) |
| − | *RPH Source | + | *Site Source (Mandatory) |
| − | *Site Source | + | *Region (Mandatory) |
| − | *Region | ||
*Where Obtained | *Where Obtained | ||
*Next Follow up | *Next Follow up | ||
*Upload Damage Images | *Upload Damage Images | ||
| − | Contact Information | + | '''''Contact Information''''' |
| + | (See [[contacts]]) | ||
*First Name | *First Name | ||
*Last Name | *Last Name | ||
| Line 73: | Line 79: | ||
*Email | *Email | ||
| − | Address Information | + | '''''Address Information''''' |
| − | *State | + | |
| − | *City | + | *State (Mandatory) |
| − | *Street | + | *City (Mandatory) |
| + | *Street (Mandatory) | ||
| − | Damage Info | + | '''''Damage Info''''' |
| − | |||
| + | *Damage Info (Mandatory) | ||
| − | + | Once completed, all the information is logged in the system database, no matter the RPH source. This action automatically triggers an email to the assigned user, with two possible results: | |
| − | *If the site exists, the user needs to verify if the location is | + | *If the site exists, the user needs to verify if the location is linked to the site correctly. |
*If the site does not exist, then the user will analyze it and verify its potential. | *If the site does not exist, then the user will analyze it and verify its potential. | ||
| − | = What happens once | + | This process is what we call ''''Detective Work'''' and is explained in the next section. |
| + | |||
| + | = What happens once an RPH is created? = | ||
| − | + | After creation, an RPH can have several outcomes: | |
| + | * RPH becomes a sale, and we ''close it as won.'' | ||
| + | * The RPH does not become a sale but is closed if (a) the decision-maker cannot be reached, (b) lack of interest, or (c) the Account Manager makes a judgment call. | ||
| − | + | Thus, the system provides the possibility of applying different kinds of statuses to every RPH and Lead and illustrates the level of progress for the sale process. | |
| − | |||
| − | + | Every time an RPH is created, the system categorizes it under the ''raw'' status by default. At this point, what we call the ''detective work'' begins. The detective work is the process that will take RPH records through the different statuses. | |
| − | + | ===So what does detective work mean?=== | |
| − | + | The greatest number of RPHs recorded in the system comes from mobile apps. But how do we know that every RPH generated is a good one and can turn into a Lead? The detective work begins by determining the contact details of whoever is responsible for the property where the pothole is located. By establishing contact with the responsible person, we can create an opportunity. | |
| − | + | ===Statuses: The pathways of an RPH=== | |
| + | |||
| + | A special team of Data Analysts checks every RPH recorded in the system. | ||
| + | |||
| + | They check that every record qualifies with the conditions we have for a pothole to be valid. These conditions include size, scope, location, and property type. The Data Analysts also provide the contact information for an initial property contact. | ||
| + | |||
| + | Then the Data Analysts prioritize these RPHs and the Leads into Tier 1 Leads or Tier 2 Leads. Finally, they will try to answer questions: Does the information already exist in the system, or do we need to do more detective work on it? Is it a duplicate record? Has a hunter tried to upload the same pothole twice to get easy money? | ||
| + | |||
| + | During the detective work and the following sales representative work, though an RPH can go through several statuses and steps, they all come down to the next point: | ||
| + | * There is a chance for a sale or | ||
| + | * There is no chance for a sale | ||
| + | |||
| + | ===Nurture P2: a special status=== | ||
| + | |||
| + | Another special status is the Nurture P2. | ||
| + | |||
| + | Strategically, from a business perspective, some accounts are more attractive than others. | ||
| + | |||
| + | For instance, Kimco Realty Co. has hundreds of shopping centers overseen by an account manager, potentially providing us with a lot of business. Large Clients, such as Kimco, would have properties nationwide and are categorized as Tier 1 Clients. | ||
| + | |||
| + | On the other hand, consider independent businesses, drug stores, food chains that have 2 or 3 branches within a city. These types of accounts are much smaller than Kimco's but are far more in number. While we may have to put in much more effort to win these accounts (vs. calling one of Kimco's account managers), they are still important and deserve the same quality service as all our clients. Independent businesses would fall under the category Tier 2 Clients. | ||
| + | |||
| + | To attend to Tier 2 Clients, we created a Nurturing program where the Data Analysis team has to objectively confirm all the data, figure out who owns it, find an email address, and put it into Nurture Status. | ||
| + | |||
| + | Then the system takes over and triggers a fully automated email campaign. The system sends out a series of emails, and according to the Lead's response, the campaign will take them through different pathways until the Lead turns cold or a quote is requested. Once the quote is requested, a sales representative enters to nurture the Lead and make a sale. | ||
| + | |||
| + | The '''program nurtures our T2 potential clients''' by providing them with quality information, individual attention without an excessive investment of time and money. | ||
| + | |||
| + | '''Note: '''When the detective work team makes an error assigning nurture status to an RPH, the system sends an "invalid email" notification (see below). Errors happen when the provided email bounces due to a bad email address, name, spelling mistake, etc., and are resolved by providing accurate, complete data and resetting the RPH to a nurture status.''' | ||
| + | |||
| + | [[File:Invalid email screencapture-crm-potholerepair-dashboard-2020-09-25-11 08 51.png|1500px|frameless|center]] | ||
| + | |||
| + | =What information is visible on the User Interface (UI)?= | ||
| + | |||
| + | The RPH's list contains basic information necessary to develop the contact further and possible opportunities. | ||
| + | |||
| + | [[File:103.jpg|1024px|frameless|center]] | ||
The information visible from the UI is: | The information visible from the UI is: | ||
| + | *Moment Account: [[Accounts#Account_Structure|parent account]] of the site (if exists). | ||
| + | *Site: name of the site or account name. | ||
| + | *Location: coordinates of the location, supported by Google Map API. | ||
| + | *Property type: the kind of building/ construction, EG: gas station, shopping mall, etc. | ||
| + | *Assigned to the person responsible for this account. | ||
| + | *Related opportunity: in case it has an RPH assign to it. | ||
| + | *Status: these are useful to quickly see the progress of the detective work executed by the Data Analysis Team. | ||
| + | *Next Action follow up: shows which are the next action scheduled. | ||
| + | *Creator: the person who uploaded the RPH. | ||
| + | *[[RPH#What_options_are_available.3F|Options]]: a set of buttons allows the user to access more actions. | ||
| − | + | = How to see the RPH list = | |
| − | |||
| − | |||
| − | |||
| − | |||
| − | |||
| − | |||
| − | |||
| − | |||
| − | |||
| − | = How to see the RPH list | ||
| − | To see the list of existing RPHs the user needs to click on | + | To see the list of existing RPHs, the user needs to click on the "Reports" menu and select "Reported PH report." |
| − | [ | + | [[File:104.jpg|1024px|frameless|center]] |
| − | Filters are available to refine the search | + | Filters are available to refine the search. |
| − | [ | + | [[File:105.jpg|1024px|frameless|center]] |
The available filters are: | The available filters are: | ||
| Line 130: | Line 176: | ||
*Status | *Status | ||
| − | Once the filter is applied and the list | + | Once the filter is applied and the list appears, a dynamic "Search bar" is also available to reduce the results. |
| − | [ | + | [[File:106.jpg|1024px|frameless|center]] |
= What options are available? = | = What options are available? = | ||
| + | The CRM provides all users with access to RPHs and available actions to analyze and work with each of them. The column on the far right is where users will find available options. The options available will vary based on RPH status (if the RPH is associated with an existing account), among others. | ||
| + | |||
| + | [[File:112.jpg|800px|frameless|center]] | ||
| − | + | By using the Options panel, the users can: | |
| + | <strong>View damage info</strong>[[File:Damageinfo.jpg|frameless]] | ||
| − | + | Shows the information related to the pothole provided by the hunter, such as site name, location, and property type, etc. It also includes a description and comments about the pothole like its size, shape, and supporting information like coordinates and Google maps search results. | |
| − | + | [[File:107.jpg|500px|frameless|center]] | |
| − | Shows the information related to the pothole | ||
| − | <strong>Send Email </strong> | + | <strong>Send Email </strong>[[File:Sendemail.jpg|frameless]] |
| − | If the RPH has an email address registered | + | If the RPH contact has an email address registered, it is possible to send an email directly from the system. |
| − | The user can choose among | + | The user can choose among templates according to the RPH progress level. |
| + | For further information please check the [[Action_Tabs#Emails|Emails]] page. | ||
| − | <strong> Move RPH to specific Site </strong> | + | <strong> Move RPH to specific Site </strong>[[File:01.1.jpg|frameless]] |
| − | Allows the user to assign the RPH to a specific | + | Allows the user to assign the reported RPH to a specific, existing site Lead or Account in the database to avoid sites' duplication. |
The user only needs to click on the button and search for the desired site. | The user only needs to click on the button and search for the desired site. | ||
| + | [[File:108.jpg|500px|frameless|center]] | ||
| − | <strong>Remove Site relationship</strong> | + | <strong>Remove Site relationship</strong>[[File:Removerel.jpg|frameless]] |
| − | Allows the user to | + | Allows the user to correct the site assignment if the RPH was incorrectly assigned. Once completed, the system asks for confirmation to remove the relationship between the RPH and the site |
| + | [[File:109.jpg|400px|frameless|center]] | ||
| − | + | <strong>Create new lead </strong>[[File:Newlead.jpg|frameless]] | |
| − | + | With this function, one can quickly convert the RPH into a Lead. The system only validates that the RPH has an assignee/owner. For more information, please visit the [[Lead]] page. | |
| − | + | If the conversion is successful, the user will receive an in-screen notification. | |
| + | [[File:110.jpg|frameless|center]] | ||
| − | + | <strong>Audio files </strong>[[File:Audio.jpg|frameless]] | |
| − | + | In case the RPH has attached audio (uploaded usually by the RPH creator), the system allows to play those audio files so that the Data Analysis Team or the Owner can capture more information. Using the same function, one can upload audio files and attach them to the RPH. | |
| + | [[File:111.jpg|400px|frameless|center]] | ||
| − | + | <strong>View History </strong>[[File:Viewhistory.jpg|frameless]] | |
| − | + | The system saves a log of all the actions done over time for the selected RPH, allowing the user to see the historical information and keep track from the earliest stage until the end of the RPH process. | |
| + | [[File:113.jpg|frameless|center]] | ||
| − | + | <strong>View RPH Images</strong>[[File:Viewimage.jpg|frameless]] | |
| − | + | Allows the users to see any image attached to the RPH for further information. | |
| − | + | <strong>Add RPH Images</strong>[[File:Addimage.jpg|frameless]] | |
| + | |||
| + | Let the user add more images for reference by selecting a file from the local disk. | ||
| + | [[File:114.jpg|frameless|center]] | ||
| − | <strong> | + | <strong>Change RPH Status</strong>[[File:Change status.jpg|frameless]] |
| − | |||
| − | |||
| − | + | The user can change the status of the RPH according to its progress. Each status has a specific meaning and represents a separate stage in the entire process. | |
| + | [[File:115.jpg|frameless|center]] | ||
| − | + | <strong>Add Note to RPH</strong>[[File:Addnote.jpg|frameless]] | |
| − | + | The system allows adding further information about the RPH. | |
| − | + | <strong>Set Next AFU Alert</strong>[[File:Afualert.jpg|frameless]] | |
| − | + | Allows the user to set a new action to follow up RPH conversion. The user can select a date, and the system will trigger a notification when the date comes up. | |
| + | [[File:116.jpg|frameless|center]] | ||
| − | + | <strong>Send Info to another email address</strong>[[File:Sendifo.jpg|frameless]] | |
| − | + | Allows the user to add a different email address and send messages (Emails) without changing the main one assigned to the RPH. | |
| − | Allows the | + | <strong> Assign to </strong>[[File:Assignto.jpg|frameless]] |
| + | |||
| + | Allows the users to assign RPHs to specific users depending on the needed action for that RPH. | ||
| + | [[File:117.jpg|frameless|center]] | ||
| − | <strong> | + | <strong>Create Opportunity</strong> [[File:Createopp.jpg|frameless]] |
| − | + | If the RPH is related to an existing Lead or account, the system quickly creates an opportunity from the RPH. The system validates: | |
| + | *The contact of the site is correctly uploaded | ||
| + | *There is no other open Opportunity for the selected site. In case there is an opportunity in progress, the system will allow us to either close the current opportunity and create a new one or split the existing one to add this RPH. | ||
| + | [[File:118.jpg|frameless|center]] | ||
| − | + | If the account related to the RPH is protected, the system will ask the user, creating the opportunity, to decide how they would like to proceed. There are two possible options: | |
| + | *Create Without Splitting: the user will not have access to work with the Item since it is owner-protected. | ||
| + | *Split With Me: The owner access remains the same, but the user can manage the opportunity. | ||
| − | + | =Quick access= | |
| − | |||
| − | |||
| − | + | *[[Lead]] | |
| − | * | + | *[[Accounts]] |
| − | * | + | *[[Contacts]] |
| + | *[[Opportunity]] | ||
| + | *[[Dispatch]] | ||
| + | *[[Invoices and Payroll]] | ||
| + | *[[External Portals]] | ||
| + | *[[Mobile_applications|Mobile applications]] | ||
| + | *[[Back-end Processes]] | ||
Latest revision as of 14:03, 15 April 2021
What is an RPH?
An RPH (Reported Pothole) is like a lite version of a lead from a business perspective.
Earlier, every time that the company went out and found a pothole, the account managers could create a Lead for it but not capture the follow-up events such as: Did it become a sale or not? Is anyone interested in having us fix it? This process created a lot of duplicates and didn't allow the company to track the sales evolution.
As a result, we decided to differentiate and create a sales process that fit our needs- to track every opportunity over time and connect seamlessly with our customers.
An RPH is a reported pothole that exists right now at a site and forms the initial step in our process. We know where the pothole is, but we don't know whether it will turn into a Lead or not. Every reported pothole is recorded in our system, whether it is a Lead or an Account.
What is the difference between a Lead and an Account?
Leads and Accounts share a lot of information, but the significant difference is whether we have done business with the customer or not. When a Lead has a quote, and the quote becomes a sale, the Lead automatically becomes an Account.
How is it generated, and when?
There are several different ways in which RPHs are created.
- Through external marketing companies: With the help of their database and marketing campaigns, we can reach more people interested in hiring our services.
The external marketing company will use an external portal to create an RPH or Lead every time they get an answer from a potential customer. This action will generate the correspondent record in our system with their footprint and stamps to know the RPH/ Lead proceeds from their database(*).
- Through manual entry: This happens, for instance, when a customer calls us, sends an email, visits our website, etc. Typically, these situations require the user to generate the RPH manually.
- Through mobile applications: By far, our mobile applications create the largest number of records in the system. We hire independent contractors, assign them a territory, and give them a license. They are paid to go out, visit every parking lot they can find, and report the potholes in the mobile application. You can find these records in the system with the pothole hunter label.
(*) We need to know when we get a contact from an independent contractor so they can get paid and credited for it. In some cases, they might also respond to a past customer, follow the same process, and earn the same pay and credit.
RPH creation through mobile application
There are two different mobile applications to create an RPH:
- Lead Generator used by Hunter: Hunters are temporary independent contractors that generate RPHs. As explained earlier, they hunt potholes.
- Proposal Maker used by Surveyors: Surveyors are full-time employees who visit and inspect sites that have requested a quote.
Both mobile applications allow the user to quickly send the RPH information to the system by following a simple process. The Data Analysis Team processes the information and analyzes the likelihood of an RPH to become an opportunity successfully.
The Hunters and Surveyors must complete/upload at least the following information:
- A photo of the reported pothole
- A leasing picture (a reference place to geolocate the pothole)
- Complete site information
Once the information is uploaded, they need to validate the address. The system triggers a whole validation process of the site database, searching for any existing account with the exact address/ location, through an integration with Google Maps with geolocation.
If the site already exists in the database, then the system will inform the user about it and automatically link to that existing Lead or Account. As the user finalizes RPH creation, the Data Analysis team will also need to validate it.
If the site does not exist, then the RPH is created without a linked site, which may be added afterward based on the analysis results performed by the Data Analysis Team. One can quickly identify this event on the screen with the icon ![]() .
.
Manual RPH creation (through CRM)
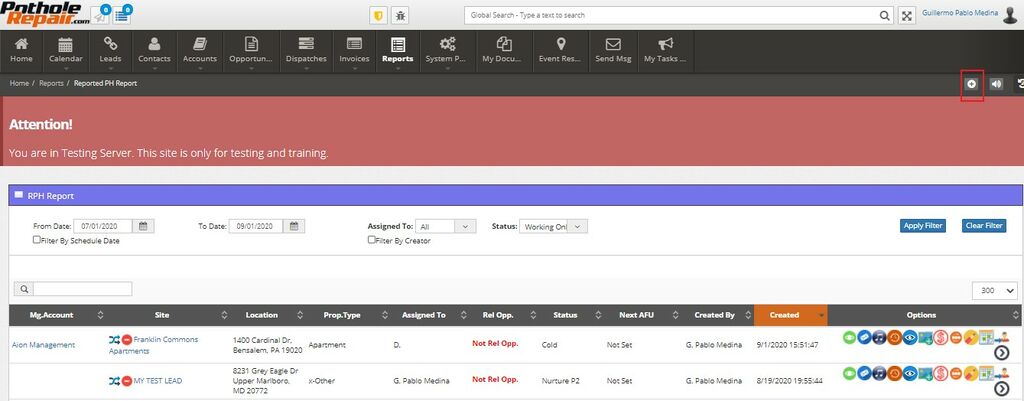
In the scenario where a customer directly contacts us or requests for a pothole repair, the CRM allows us to create an RPH through a quick process manually. To create an RPH manually, the user needs to press the "![]() " icon on the top right corner of the menu section.
" icon on the top right corner of the menu section.
This option shows a form with the following sections:
General information
- RPH status (Mandatory)
- Owner (Mandatory)
- Assign to
- Company/Site (Mandatory)
- Property Type (Mandatory)
- RPH Source (Mandatory)
- Site Source (Mandatory)
- Region (Mandatory)
- Where Obtained
- Next Follow up
- Upload Damage Images
Contact Information (See contacts)
- First Name
- Last Name
- Direct
- Mobile
Address Information
- State (Mandatory)
- City (Mandatory)
- Street (Mandatory)
Damage Info
- Damage Info (Mandatory)
Once completed, all the information is logged in the system database, no matter the RPH source. This action automatically triggers an email to the assigned user, with two possible results:
- If the site exists, the user needs to verify if the location is linked to the site correctly.
- If the site does not exist, then the user will analyze it and verify its potential.
This process is what we call 'Detective Work' and is explained in the next section.
What happens once an RPH is created?
After creation, an RPH can have several outcomes:
- RPH becomes a sale, and we close it as won.
- The RPH does not become a sale but is closed if (a) the decision-maker cannot be reached, (b) lack of interest, or (c) the Account Manager makes a judgment call.
Thus, the system provides the possibility of applying different kinds of statuses to every RPH and Lead and illustrates the level of progress for the sale process.
Every time an RPH is created, the system categorizes it under the raw status by default. At this point, what we call the detective work begins. The detective work is the process that will take RPH records through the different statuses.
So what does detective work mean?
The greatest number of RPHs recorded in the system comes from mobile apps. But how do we know that every RPH generated is a good one and can turn into a Lead? The detective work begins by determining the contact details of whoever is responsible for the property where the pothole is located. By establishing contact with the responsible person, we can create an opportunity.
Statuses: The pathways of an RPH
A special team of Data Analysts checks every RPH recorded in the system.
They check that every record qualifies with the conditions we have for a pothole to be valid. These conditions include size, scope, location, and property type. The Data Analysts also provide the contact information for an initial property contact.
Then the Data Analysts prioritize these RPHs and the Leads into Tier 1 Leads or Tier 2 Leads. Finally, they will try to answer questions: Does the information already exist in the system, or do we need to do more detective work on it? Is it a duplicate record? Has a hunter tried to upload the same pothole twice to get easy money?
During the detective work and the following sales representative work, though an RPH can go through several statuses and steps, they all come down to the next point:
- There is a chance for a sale or
- There is no chance for a sale
Nurture P2: a special status
Another special status is the Nurture P2.
Strategically, from a business perspective, some accounts are more attractive than others.
For instance, Kimco Realty Co. has hundreds of shopping centers overseen by an account manager, potentially providing us with a lot of business. Large Clients, such as Kimco, would have properties nationwide and are categorized as Tier 1 Clients.
On the other hand, consider independent businesses, drug stores, food chains that have 2 or 3 branches within a city. These types of accounts are much smaller than Kimco's but are far more in number. While we may have to put in much more effort to win these accounts (vs. calling one of Kimco's account managers), they are still important and deserve the same quality service as all our clients. Independent businesses would fall under the category Tier 2 Clients.
To attend to Tier 2 Clients, we created a Nurturing program where the Data Analysis team has to objectively confirm all the data, figure out who owns it, find an email address, and put it into Nurture Status.
Then the system takes over and triggers a fully automated email campaign. The system sends out a series of emails, and according to the Lead's response, the campaign will take them through different pathways until the Lead turns cold or a quote is requested. Once the quote is requested, a sales representative enters to nurture the Lead and make a sale.
The program nurtures our T2 potential clients by providing them with quality information, individual attention without an excessive investment of time and money.
Note: When the detective work team makes an error assigning nurture status to an RPH, the system sends an "invalid email" notification (see below). Errors happen when the provided email bounces due to a bad email address, name, spelling mistake, etc., and are resolved by providing accurate, complete data and resetting the RPH to a nurture status.
What information is visible on the User Interface (UI)?
The RPH's list contains basic information necessary to develop the contact further and possible opportunities.
The information visible from the UI is:
- Moment Account: parent account of the site (if exists).
- Site: name of the site or account name.
- Location: coordinates of the location, supported by Google Map API.
- Property type: the kind of building/ construction, EG: gas station, shopping mall, etc.
- Assigned to the person responsible for this account.
- Related opportunity: in case it has an RPH assign to it.
- Status: these are useful to quickly see the progress of the detective work executed by the Data Analysis Team.
- Next Action follow up: shows which are the next action scheduled.
- Creator: the person who uploaded the RPH.
- Options: a set of buttons allows the user to access more actions.
How to see the RPH list
To see the list of existing RPHs, the user needs to click on the "Reports" menu and select "Reported PH report."
Filters are available to refine the search.
The available filters are:
- From date
- To date
- Assigned to
- Status
Once the filter is applied and the list appears, a dynamic "Search bar" is also available to reduce the results.
What options are available?
The CRM provides all users with access to RPHs and available actions to analyze and work with each of them. The column on the far right is where users will find available options. The options available will vary based on RPH status (if the RPH is associated with an existing account), among others.
By using the Options panel, the users can:
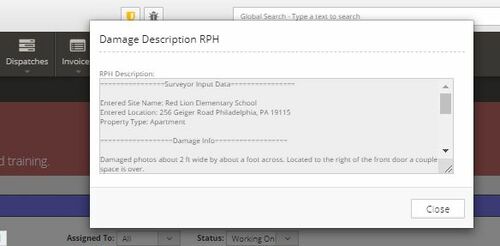
Shows the information related to the pothole provided by the hunter, such as site name, location, and property type, etc. It also includes a description and comments about the pothole like its size, shape, and supporting information like coordinates and Google maps search results.
If the RPH contact has an email address registered, it is possible to send an email directly from the system. The user can choose among templates according to the RPH progress level. For further information please check the Emails page.
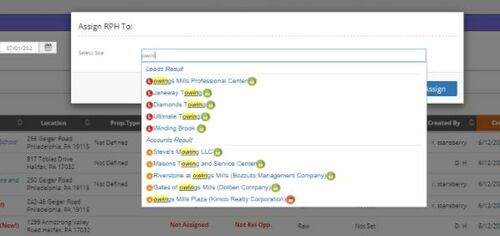
Allows the user to assign the reported RPH to a specific, existing site Lead or Account in the database to avoid sites' duplication.
The user only needs to click on the button and search for the desired site.
Allows the user to correct the site assignment if the RPH was incorrectly assigned. Once completed, the system asks for confirmation to remove the relationship between the RPH and the site
With this function, one can quickly convert the RPH into a Lead. The system only validates that the RPH has an assignee/owner. For more information, please visit the Lead page.
If the conversion is successful, the user will receive an in-screen notification.
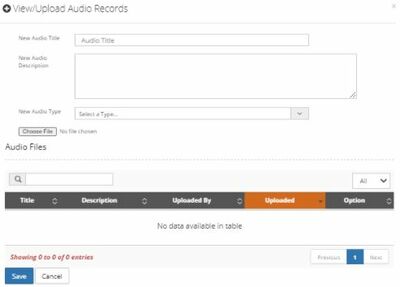
In case the RPH has attached audio (uploaded usually by the RPH creator), the system allows to play those audio files so that the Data Analysis Team or the Owner can capture more information. Using the same function, one can upload audio files and attach them to the RPH.
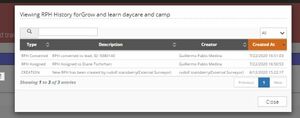
The system saves a log of all the actions done over time for the selected RPH, allowing the user to see the historical information and keep track from the earliest stage until the end of the RPH process.
Allows the users to see any image attached to the RPH for further information.
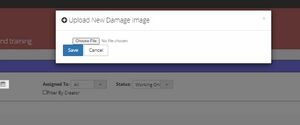
Let the user add more images for reference by selecting a file from the local disk.
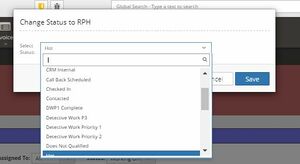
The user can change the status of the RPH according to its progress. Each status has a specific meaning and represents a separate stage in the entire process.
The system allows adding further information about the RPH.
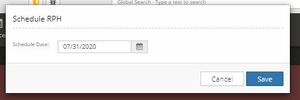
Allows the user to set a new action to follow up RPH conversion. The user can select a date, and the system will trigger a notification when the date comes up.
Send Info to another email address![]()
Allows the user to add a different email address and send messages (Emails) without changing the main one assigned to the RPH.
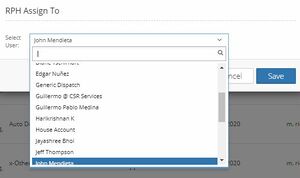
Allows the users to assign RPHs to specific users depending on the needed action for that RPH.
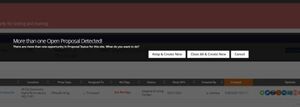
If the RPH is related to an existing Lead or account, the system quickly creates an opportunity from the RPH. The system validates:
- The contact of the site is correctly uploaded
- There is no other open Opportunity for the selected site. In case there is an opportunity in progress, the system will allow us to either close the current opportunity and create a new one or split the existing one to add this RPH.
If the account related to the RPH is protected, the system will ask the user, creating the opportunity, to decide how they would like to proceed. There are two possible options:
- Create Without Splitting: the user will not have access to work with the Item since it is owner-protected.
- Split With Me: The owner access remains the same, but the user can manage the opportunity.
