Difference between revisions of "Invoices and Payroll"
| Line 21: | Line 21: | ||
[[File:I3.png|750px|thumb|center]] | [[File:I3.png|750px|thumb|center]] | ||
| − | After | + | After ''creating the invoice,'' the user needs to save it and continue verifying a few more things. Remember, the user must keep a backup copy for every document generated during this process. |
Under the "products" tab, the user has to double-check that items sold match items completed. If there is a difference, it either means the client didn't want to repair something, or the technicians found some extra repairs and added them. When that's the case, those added repairs will appear in the product list under the "Additional" line with a tick icon. | Under the "products" tab, the user has to double-check that items sold match items completed. If there is a difference, it either means the client didn't want to repair something, or the technicians found some extra repairs and added them. When that's the case, those added repairs will appear in the product list under the "Additional" line with a tick icon. | ||
| Line 39: | Line 39: | ||
Once everything has been verified, the user can proceed to generate the invoice document. | Once everything has been verified, the user can proceed to generate the invoice document. | ||
| − | + | ''(*)Note: there is an option to "Create Installments." First, you need to put the amount of installment, then fill in the due date and save it.'' | |
[[File:I14.png|1000px|thumb|center]] | [[File:I14.png|1000px|thumb|center]] | ||
| Line 110: | Line 110: | ||
[[File:IP 7.png|1000px|thumb|center]] | [[File:IP 7.png|1000px|thumb|center]] | ||
| − | + | ''Note: the user could manually add all the details for a new payment by filling each bracket one by one. Of course, as the user may expect, this way is longer and harder. So if the user is choosing in it, when you finish adding the new payment, remember to change the status too.'' | |
=Invoice Menu= | =Invoice Menu= | ||
Revision as of 16:11, 15 April 2021
Invoices and Payroll
When an opportunity is created, it becomes a dispatch. When the dispatch is finished, it will give way to the next step. Each module works in tandem with other modules in the CRM. This module, Invoices, and Payroll, is the last step of the workflow.
Invoicing Process
The invoicing process starts once the dispatch has been delivered and completed by the technicians. So the first step in the process is to check the dispatch.
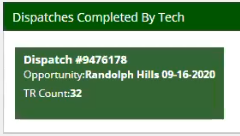
The user needs to go to the Dispatch Dashboard and click on any job under the section "Completed by tech."
This action will take you to the actual dispatch work page.
Here the user is going to create the invoice. To do it, click on the "create an invoice" button after selecting the option for "Edit Mode." Then this action will take us to the next screen, in which the user needs to control the finished jobs by checking the images of the work performed by our technicians. Here you have a dropdown menu next to each product, which allows you to select the option according to the job's quality. When you choose "Not Completed" or "Poor Quality," the system triggers a remedial repair to fix it.
Once the fix is accepted, click on "Create invoice" at the bottom of the screen to continue with the next step.
After creating the invoice, the user needs to save it and continue verifying a few more things. Remember, the user must keep a backup copy for every document generated during this process.
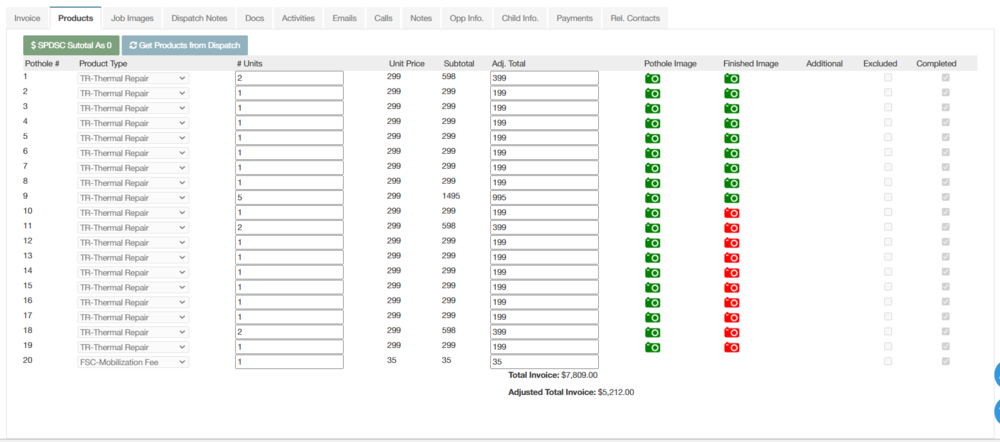
Under the "products" tab, the user has to double-check that items sold match items completed. If there is a difference, it either means the client didn't want to repair something, or the technicians found some extra repairs and added them. When that's the case, those added repairs will appear in the product list under the "Additional" line with a tick icon.
Next, under the tab for "documents," the user needs to verify that the account manager's documents match what is on the product table.
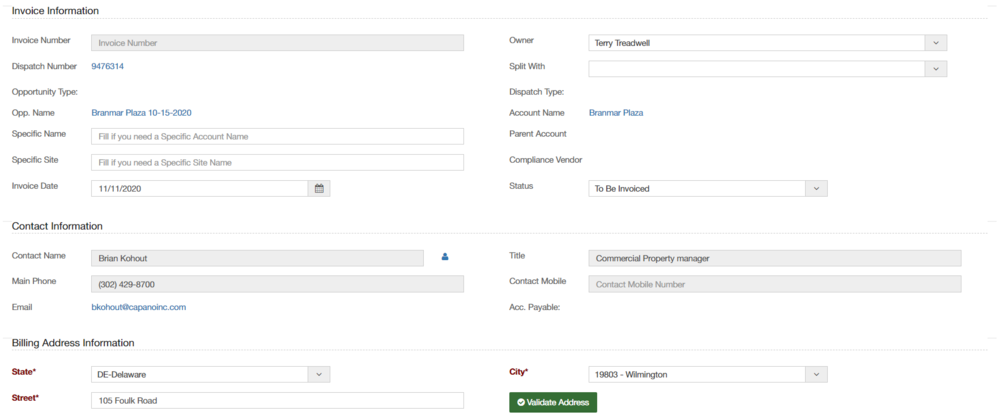
Then the user must check whether the person who is going to receive the invoice is the correct one, and the same applies to the address. Sometimes the system confuses the billing address with the contact address, so it is essential to always check this information with the one in the account module to avoid sending the invoice to the wrong address.
Another important section here is "Invoice detail," where you can see notes from the account manager and the payment terms. The company usually has a Net ten days term for payment, but of course, it can be modified for more extended periods if needed.
Remember that most of the tab information is auto-populated from the Account and Opportunity modules, so it is imperative to double-check the information is correct.
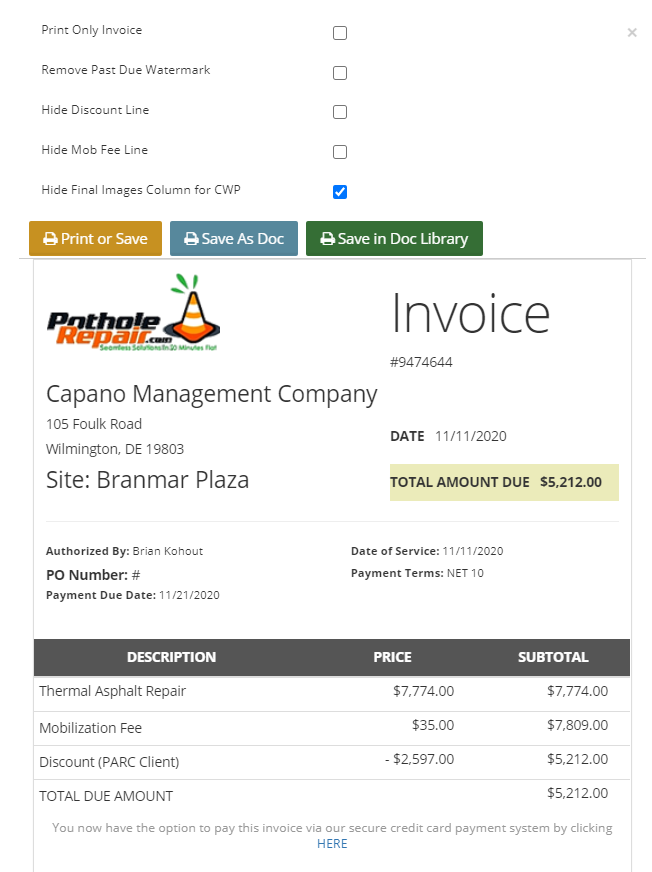
Once everything has been verified, the user can proceed to generate the invoice document.
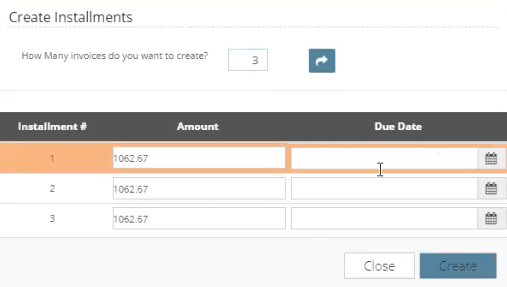
(*)Note: there is an option to "Create Installments." First, you need to put the amount of installment, then fill in the due date and save it.
Here the user takes a final look to make sure everything is correct and then saves it.
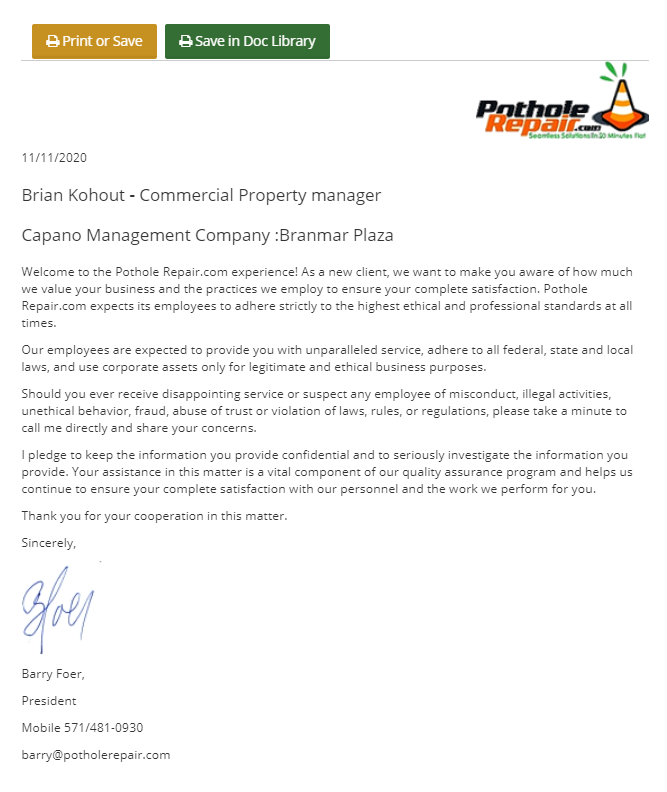
If the opportunity type is "New Business," the user must always attach an ethical compliance document.
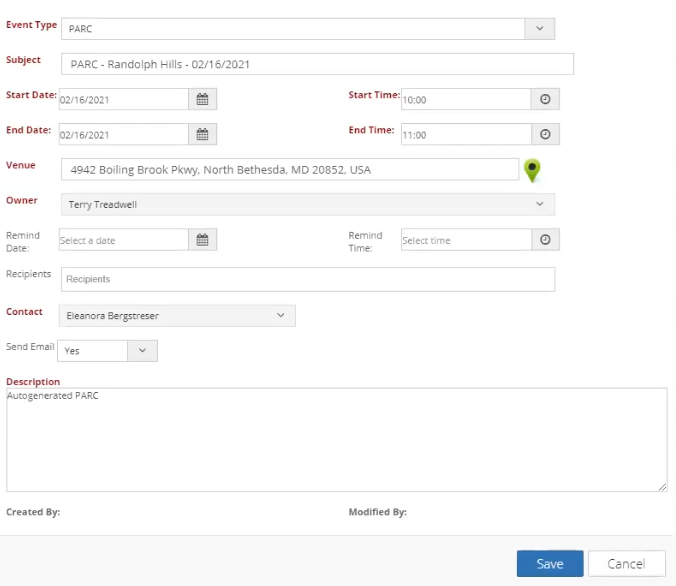
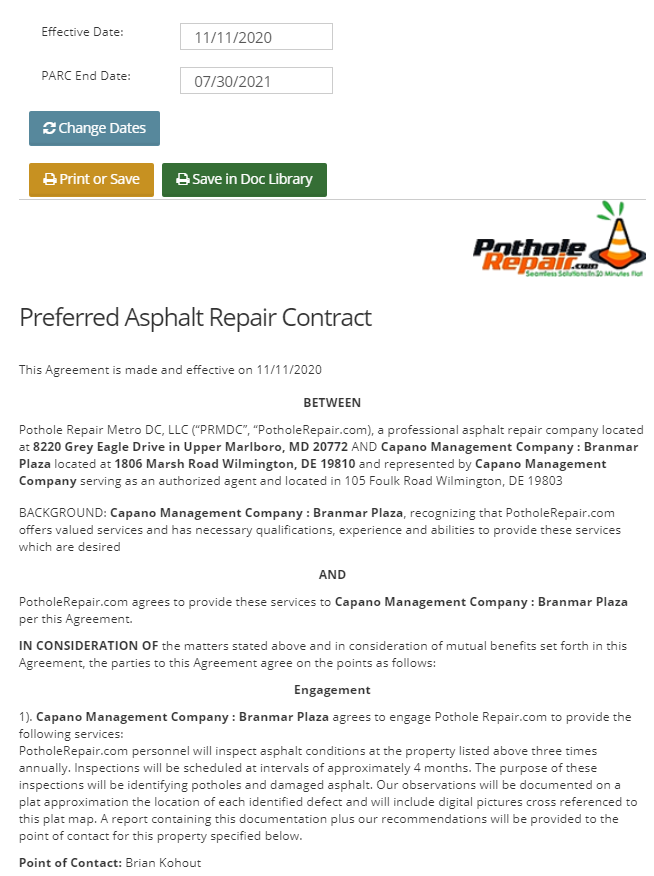
If the client had bought a PARC Agreement, the user would have to add it by clicking the button "Add New PARC," which is on the screen's top right corner. A window will pop up to fill out the details of the agreement. The same applies to renewing the PARC. This action automatically creates the PARC Inspection Events as well.
After that, the user can generate the actual PARC Agreement Document.
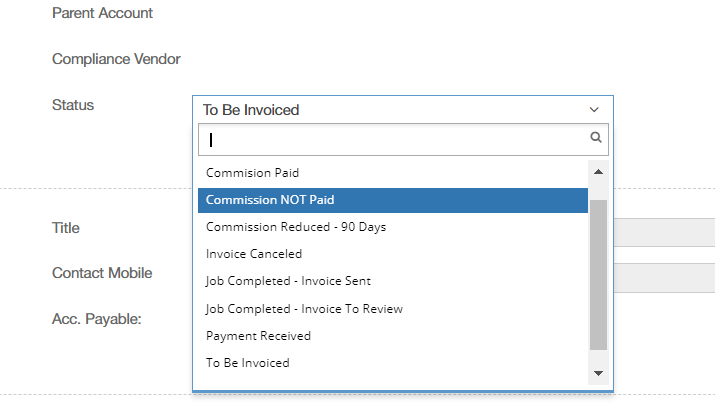
Finally, there's the status. By default, the system sets the status "to be invoiced," so the user needs to change it to "job completed - invoice to review" once the user has uploaded all the necessary documents.
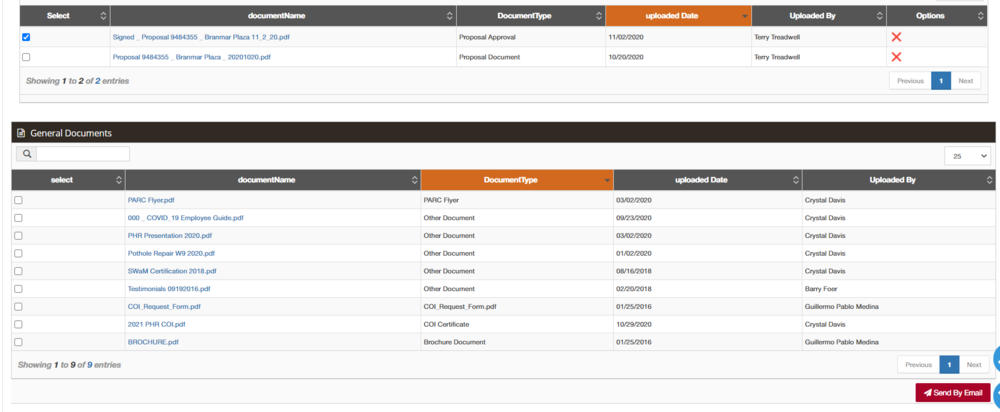
Once all this is done, the user wants to send it to the client. To do it, go to the "Document" tab, where you should find all the documents so far created. Then select those you want to send and click on "Send By Email."
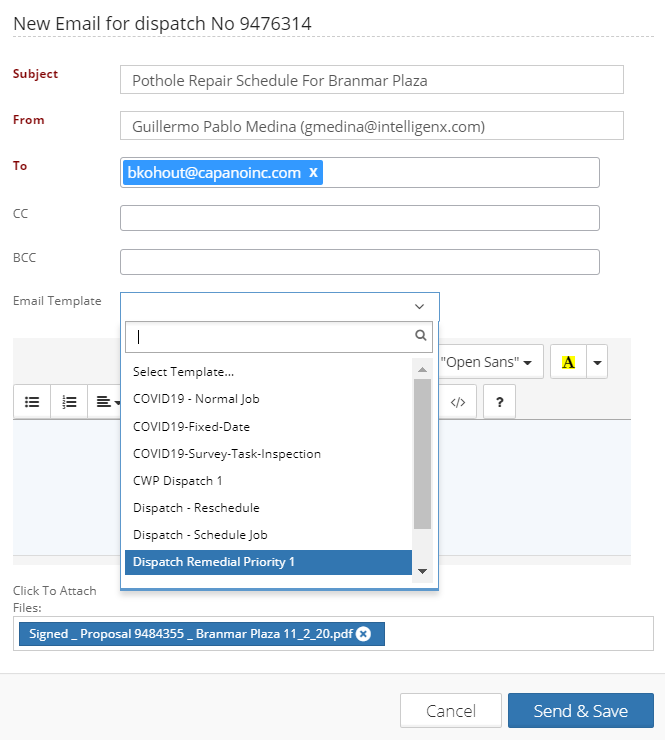
The next step will be selecting the appropriate email template. Like the user explained in previous modules, the idea of these templates it's to communicate the correct information to our customers.
After the user has sent the email with all the information for our customer, the user can consider the invoicing process finished.
Finally, the user needs to change the status once again to "Job Completed - Invoice Sent."
Invoice Payment Process
What the user will see now is the process the user needs to follow when the user receives the payment of an invoice. This process applies to regular invoices where payment methods are either check or bank transfer. It doesn't include credit card payments. This process is automated and run by the system, and the same is explained in the External Portals section.
The process starts with the search of the invoice. First, the user needs to access the Invoice Payment Menu and then do the search.
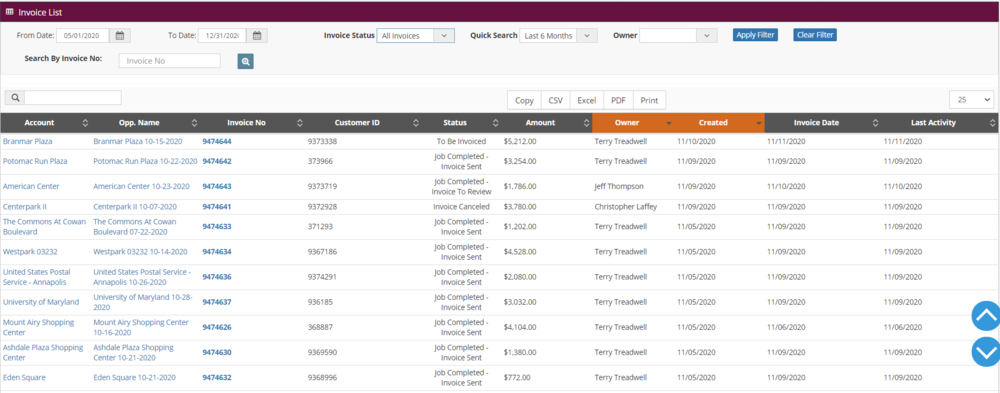
Just like in previous modules, the user has many ways to search. The user could filter the information by dates, status, owner, etc. In this case, the user is using the Invoice Number.
Once the user has the correct invoice, the user needs to match the total amount in the document with the amount in the system-
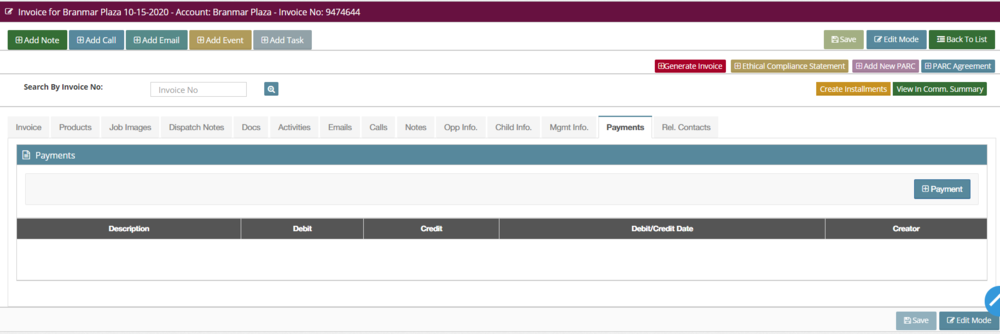
Now that the user has verified the information matches, it is time to process the payment. This process is very simple, click on edit mode and then click the green button to add a new payment.
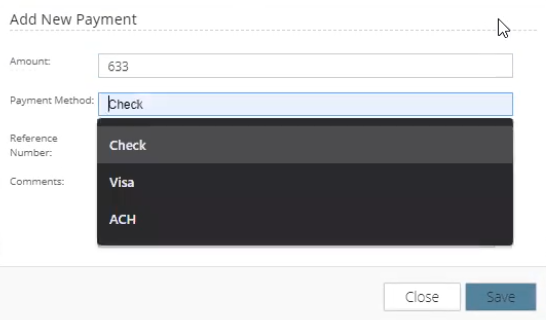
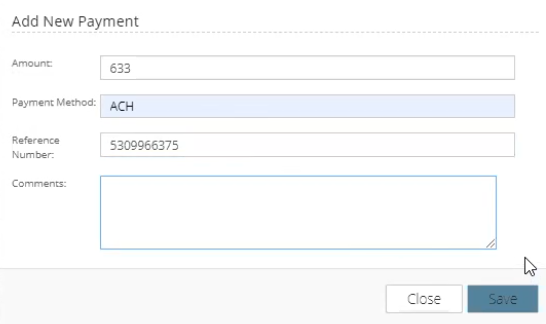
This action will open a pop-up window to add the amount, payment method, and reference number for the invoice.
Finally, once the payment has been saved, the system will change the invoice's status to "Payment Received."
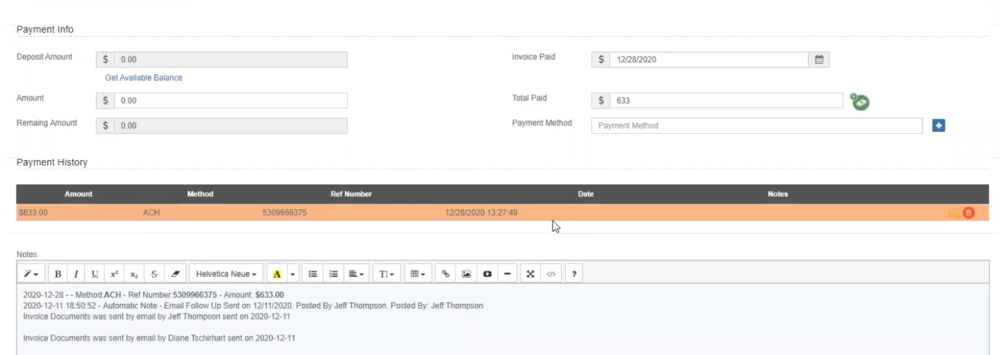
This image is how the payment is processed and the way it should look. As you can see, the remaining amount is zero, and the details below show the payment method and reference number. The system also adds a note with the record at the bottom of the screen for tracking purposes.
Note: the user could manually add all the details for a new payment by filling each bracket one by one. Of course, as the user may expect, this way is longer and harder. So if the user is choosing in it, when you finish adding the new payment, remember to change the status too.
Invoice Menu
View all invoices
The module's power page is where the user can access all the invoices ever created in the CRM.
Invoice payments
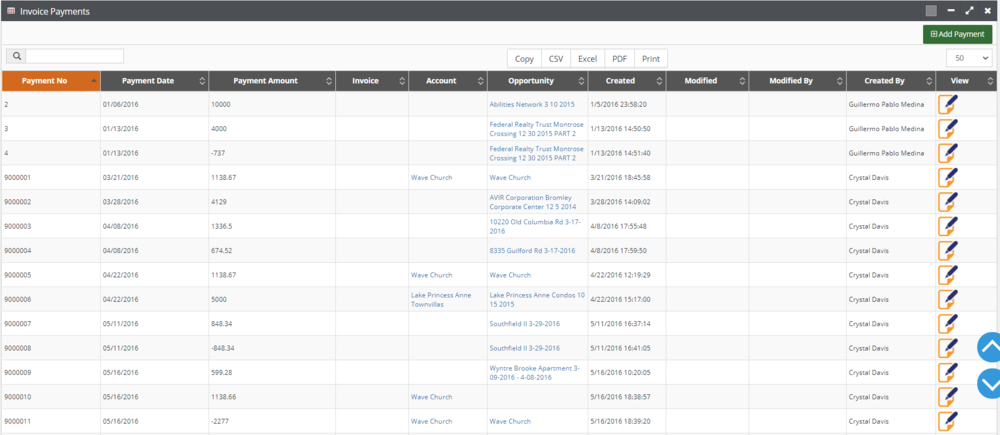
Here you can see deposit payments. These are not total payments.
Sometimes our customers know they will have to pay a hefty bill, so they prefer to put a deposit down before the job is done.
In such cases, when the invoice is generated, the system detects that deposit and subtracts the money.
If the deposit is big enough to pay the full price, it automatically removes that amount creating a new line on the payment section in the account and the invoice module. It also changes the status of the invoice to "payment received."
Should there be exceeding money, the system will create a new deposit for the remaining amount. On the contrary, when the deposit is not enough to pay the full bill, it will create a partial payment.
Add invoice payments
The "invoice payments" option to add a payment is the same as the invoice, under the tab for "payments."
The user usually uses this section to add a payment when the invoice hasn't been generated yet. An excellent example of this would be at the end of the financial year when a customer wants to pay for our services before a new financial year starts.
Under "payment information," hit the blue button to select the opportunity or the green button to select the account.
Past Due Invoice Report
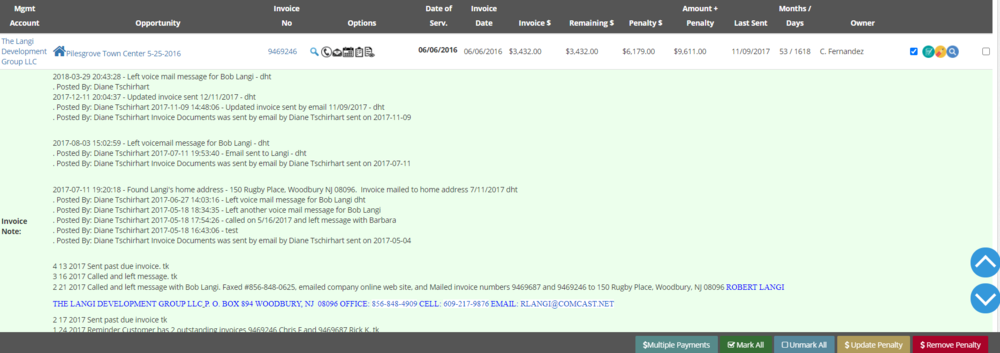
The Past Due Invoice Report is where an invoice will appear for the first time the day after its due date has passed. And the only thing that will make it go away is when it gets paid.
Again here, the user can use different filters to search for an invoice easily.
You can update the penalty for the invoice by selecting the invoice and clicking "Update Penalty" in the down right corner.
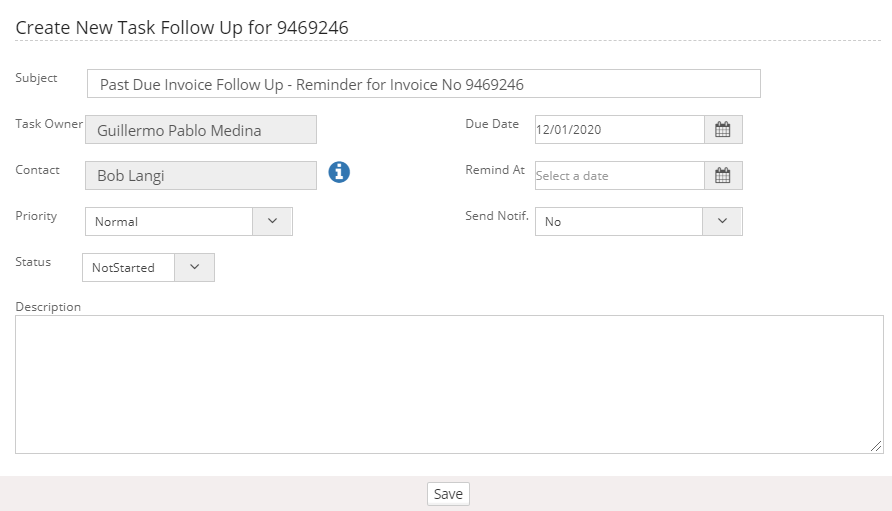
A window will pop up to create a new follow-up event and notify the customer about their debt.
Another way to update the penalty is by using the checkboxes. These checkboxes help the user quickly update or select a large number of invoices simultaneously. The checkboxes on the inside are for penalties, and the ones on the outside are for multiple payments.
Finally, there is the same set of actions to add notes, see the documents, and more than the user has explained before, which are consistent throughout the CRM. You can see them by clicking "Show Notes" at the top right corner of the screen.
It will show the user when the work was done when the invoice was sent, and its amount. It will show the user the amount to be paid, whether there is a penalty, the amount, and the due date.
CC Payments Report
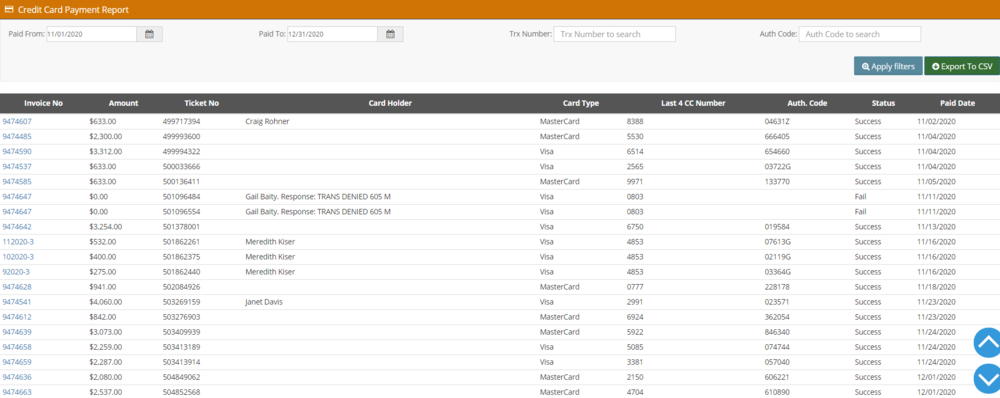
All invoices paid by credit card will show up here.
The good thing about credit card payments is that it works with an API that communicates our system with the bank's server. Every time a customer pays by credit card, it will automatically update the status of the invoice and all records within the CRM, reducing the need for human interaction to update the information manually.
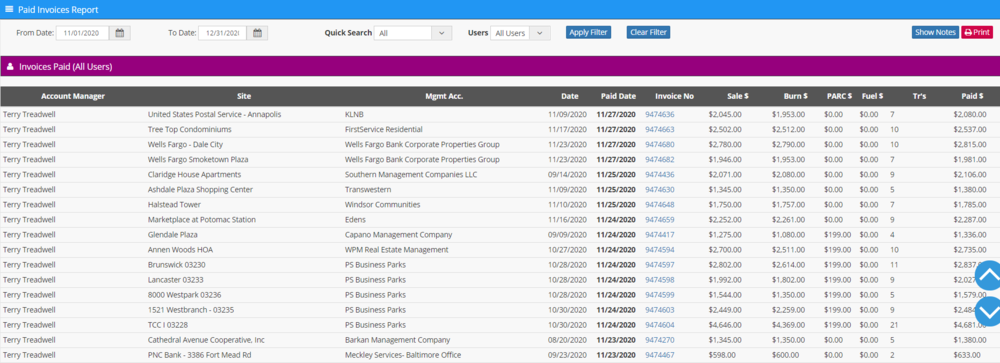
Paid Invoices Report
Once the payment has been put through the system, it appears again over this report.
This report is beneficial to aid our accounting software, which is completely separated from the CRM. It is also an excellent way to pull the information needed when it is time to pay commissions.
The user could say it is like a power page for paid invoices only. It works the same way as the power page for viewing all invoices.
Partner Invoices
These work in the same way as the other reports, except this time, the report will show those invoices related to an external proposal.
Cold Weather Repair
During the cold-weather program, the invoicing process is precisely the same as during the standard time. The difference is that the user will be sending the invoice twice because the user sends the first invoice after the temporary repair is completed and another invoice 2 or 3 months later once the final repair is finished.
The two invoices will be sent regardless if they have been paid or not.
Remedial Repair
When a job is finished but hasn't been done correctly or fails for any reason, the company will take responsibility for it and provide a remedial repair for free. The invoicing process for this case is precisely the same as for a standard repair. The only difference is that the user generates an invoice for zero dollars.
Technician Payroll Process
Technicians get paid every Friday, and the period goes from Sunday to Saturday.
The Payroll Process starts with counting the number of jobs done by each technician.
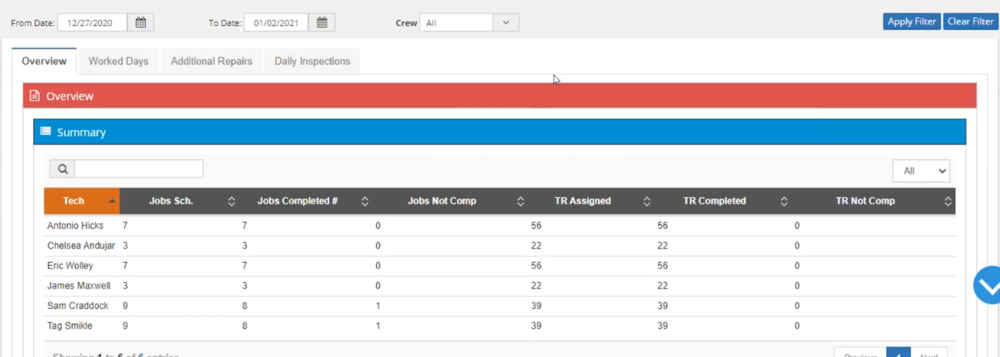
First, the user needs to access the "Crew Payment Report", which is under the "Operation" section in the "Reports" menu.
Applying filters will show the TR (Thermal Repairs) count of all technicians. The Operation Department must keep this information updated. If someone is out or has taken a day off, that kind of information needs to be considered for processing the payrolls correctly. So everything comes down to the dispatch. If the Dispatch Module information is good, then it will be straightforward to continue with the Payroll Process.
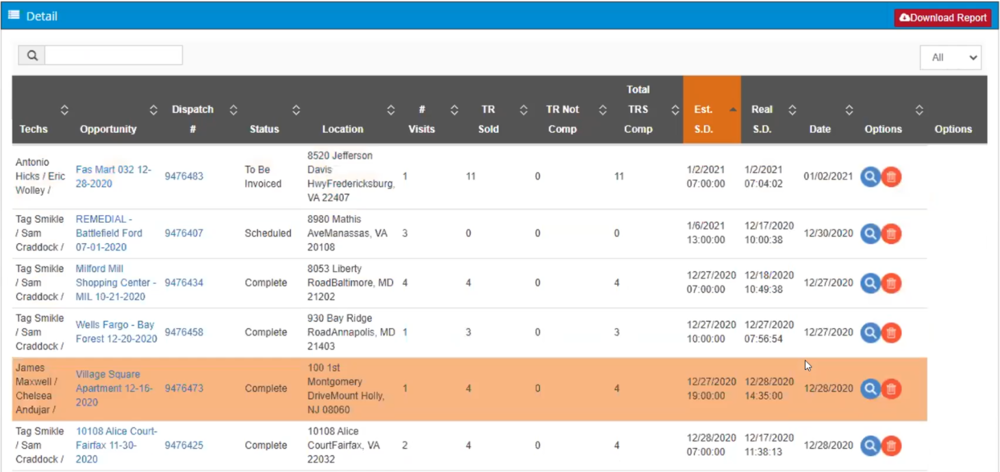
It is also essential to check the following section because if the work is a two-day job, it doubles the records, and one of them needs to be erased.
For instance, if someone finds out the record for Circle Woods is twice, they could eliminate it by clicking on the red trash icon.
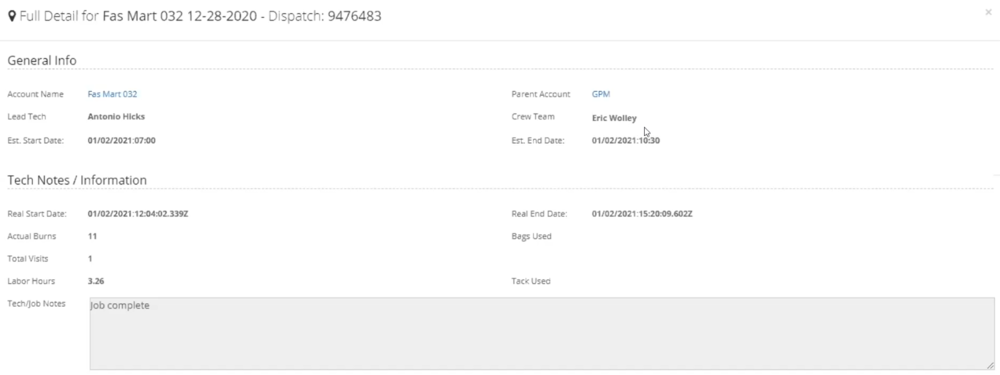
On the other hand, another nice feature is the magnifying glass, which allows the user to access more details about the job.
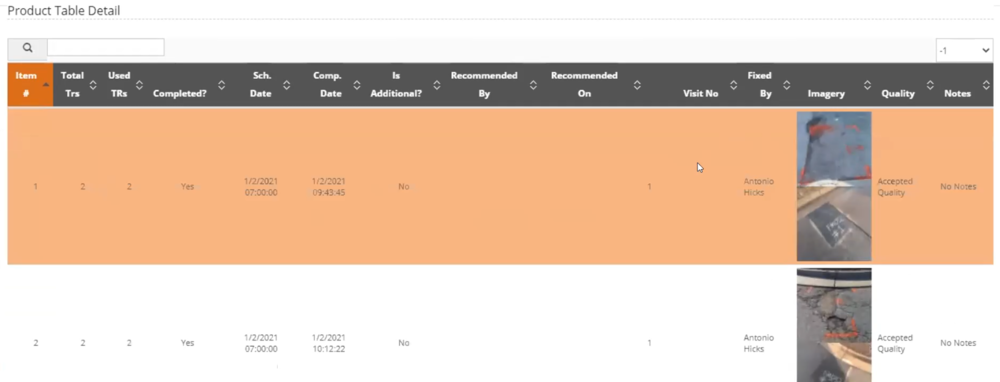
This option tells you how many burns the job was, and you can see the pictures that came through when the technicians finished the repairs. This is one way to see which technician did which repair, especially in those cases when the job is complex, and there might be two or three crews working at the same time, at the same property.
After that, the user can continue to the next step, which is to check the TR count Technician by Technician, to get the report to generate the payroll for them.
Now the user needs to filter by the technician and go to the tab for "Payroll Payment."
The first section is the general overview, and it shows the jobs and TRs. The following one is for the Payment Items: the salary and a bonus, for instance.
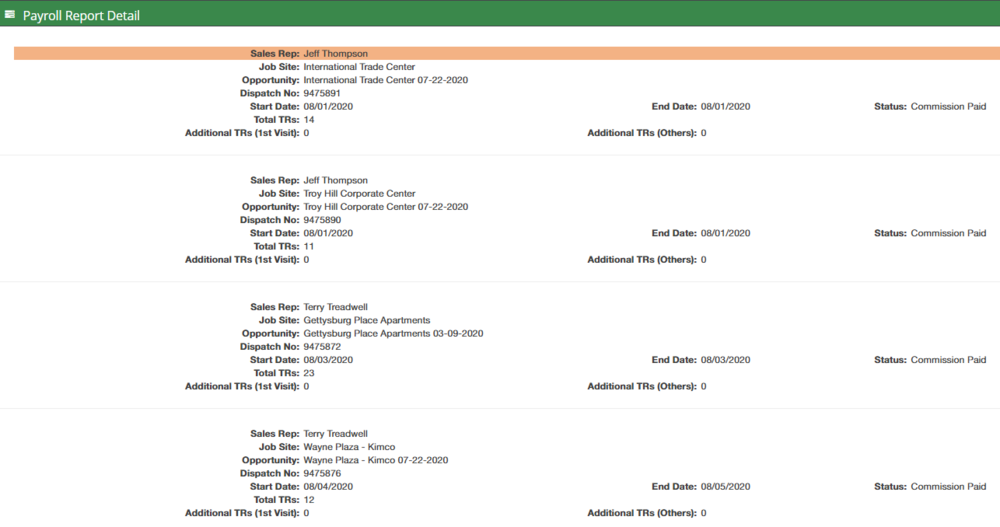
Then the user has the Report Detail, which contains a list of jobs done by the technician and their descriptions.
After checking all the information in this tab, the user can either add an item to the salary or send and save it. We can do this with the buttons at the top right corner of the section.
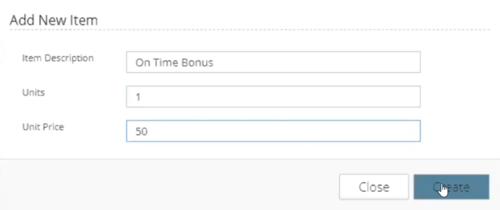
In the example above, the user has added a bonus for this technician. As you can see, it is a simple thing to do. Just click on "Add Item" and then fill the brackets and save it.
After that, you will see the item added to the payroll. And of course, you could add more, erase or edit these items.
Once the process is finished, it is time to save the payroll. The system will automatically send it to the technician's email address and keep a copy in its CRM file. Users with special admin permissions can only access this CRM file.
Comission Process
Except for the technicians, the rest of the staff gets paid monthly. Nevertheless, the Commission Process is very similar to the Technicians Payroll Process.
First, the user needs to access the "Commission Due Summary", which is under the "Payroll" section in the "Reports" menu.
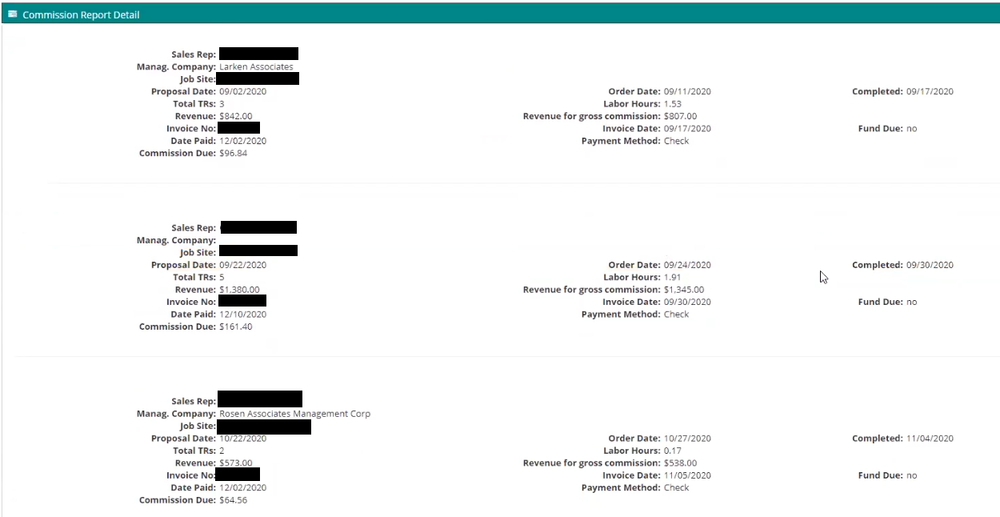
Then, and again like in every other module, you need to apply filters. It is very important to filter the status by "payment received," which will show the sites in which each Account Manager has worked during the month. The details - date, the invoice number, the price and commission, and the owner- are the ones the user needs to check to pay the commissions correctly.
After checking the information is correct, the user only needs to generate a Commission Report, which is the same as the user does for the technicians.
To generate this report, the user needs to access the "Commission Due Report". Then again, apply filters to see one by one the Account Managers and create a report for each of them (make sure to search using the status filter "Commission Paid").
From this point, it is the same as the Technician Payroll Process. The user could add items to the salary and erase or edit these items. Once the user has finished, click on "send by email" to send it to the Account Manager email address, just like the user did in the previous section.
