Contacts
What is a contact?
Let’s revisit a concept we touched on earlier in this manual, the idea that we have a 3-dimensional dataset. You will find this concept throughout the system.
We also explain the 3 tips of this triangle: the specific site, the human and the property management.
When we talk about Contacts we are talking about the human tip of this triangle, so the contact records all things related to the human.
Within the overall system contacts is a huge module, this entire arena is nothing but human beings that manage specific sites and work for specific companies. And those 2 are not often the same, the company they work for is not typically the same company that manages the property.
How to create a Contact
As you may have realized, there are many ways in which most of the process can be done within the system. Well creating a new contact is not an exception, but for now and to keep it simple let's just say there are two ways to create a new contact.
So, every time an Opportunity is generated from a Lead, and this is closed as won, the system will automatically convert that Lead into an account. Therefore the contact will be created (if it does not already exist) and recorded in the database. From this moment then, the contact will be available to be selected again in the future as the contact of a new RPH, Lead or Opportunity.
As in the other modules, there are two ways in which a contact can be created. Manually, performed by the users on the CRM by using the “New Contact” form ; and the automated one, triggered by the system after the Lead conversion;
- Automated: Once an opportunity is created for a Lead and closed as won, the system automatically converts the Lead into an Account and saves the Contact in the database.
- Manual: this option is available for those cases in which a Contact needs to manually be created by a user, accessible through the bar menu.
Note: when creating a new contact from the Account Module, the system will auto populate all the information related to that specific account and which have been previously recorded.
New Contact Form
Contact information can be found in tabs that contain different types of information, and which is unique for such Contact.
These Tabs are:
- Contact
- Events & Activities
- Emails
- Calls
- Notes
- Related Accounts
- Linked Leads
- Related Opps
- History
Contact
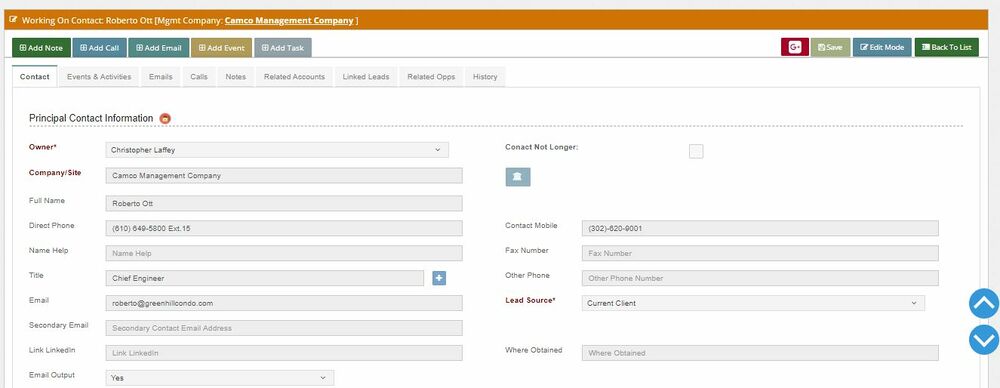
This tab contains basic information about the Contact. It is separated in subsections for a better sorting of the information. Note that this information is the same that needs to be filled in the “New Contact Form” when creating a new Contact.
Principal Contact Information
- Owner
- Contact Not Longer
- Company/Site
- Full Name
- Direct Phone
- Contact Mobile
- Name Help
- Fax Number
- Title
- Other Phone
- Lead Source
- Secondary Email
- Link LinkedIn
- Where Obtained
- Email Output
Contact Description
Description: free text box for contact description
Address Information
- State
- City
- Street
- Suite
- Apartment
- Bill BOX
- Electronic Bill Mail
- Special Billing Instructions
Events & Activities
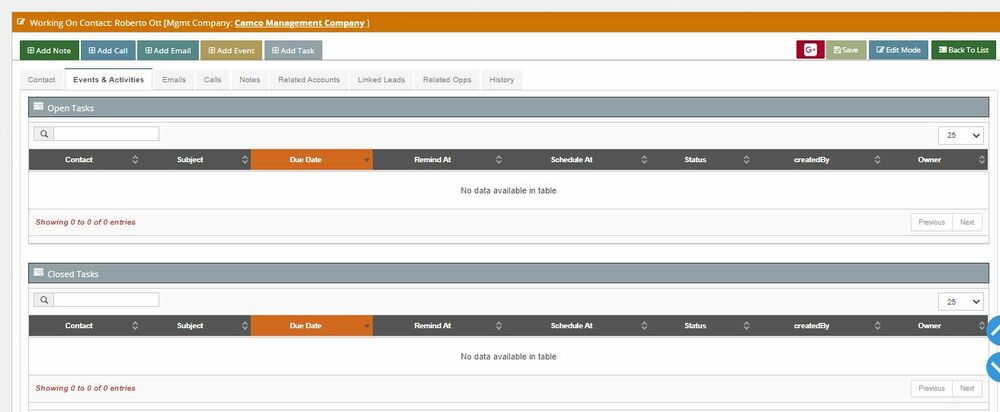
This tab shows the Tasks or events created related to the Contact.
For further information please visit the Events and Task page.
Emails
This tab contains a record with all mails exchanged with the contact. Emails will appear sorted within these columns:
- Subject
- From
- To
- Created (date)
There is also a search bar on the top left corner allowing the user to refine the search.
Calls
Like the section above, this tab contains a record with all calls exchanged with the contact.
Calls will appear sorted within these columns:
- Subject
- Contact
- Call type
- Owner
- Created (date)
There is also a search bar on the top left corner allowing the user to refine the search
Notes
Like the section above, this tab contains a record with all notes made to the contact.
Notes will appear sorted within this columns:
- Title
- Created (date)
- Owner
There is also a search bar on the top left corner allowing the user to refine the search
Related Accounts
This tab shows all accounts to which the contact is related or referenced.
Note that when an account is shown with a house icon, it means that such account is a parent account.
Records will appear sorted within these columns:
- Account
- Last activity
- Created
- Owner
There is a search bar too on the top left corner, allowing the user to refine the search
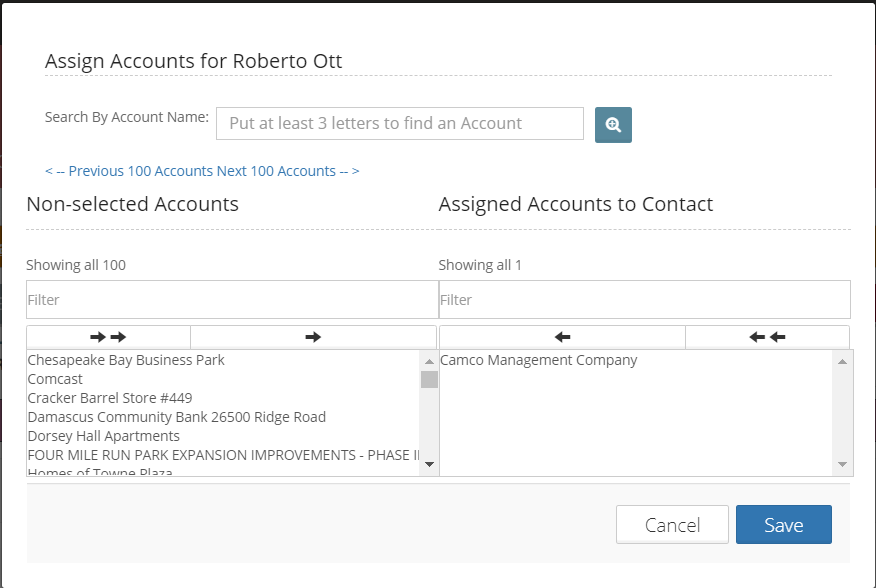
Additionally, the system allows the user to add more related accounts from the “Relate Account” button.
This action opens a window with two sections. One allowing the user to search for the account wanting to relate; and another one showing the accounts already related to it. Again, the search bar is also available to refine the search.
Linked Leads
This tab allows the user to access all Leads related to a contact.
Like in previous tabs, records will appear sorted within these columns:
- Account
- Last activity
- Created
- Owner
There is a search bar as well on the top left corner, allowing the user to refine the search
Related Opportunities
Very similar to the Accounts Module, in this tab the user can see and access all the opportunities related to the Contact. A Contact can have one, two or more active opportunities at the same time, unlike a Lead that can only have one active opportunity at a time.
The fields available on this tab are:
- Opportunity name: hyperlink to open the opportunity. Will always be the sequence of the account name and the date when it was created
- Contact: Main contact of the account that holds the opportunity
- Requested date
- Valid until: due date of the opportunity
- Closing Date
- Quotes: informs the status of the Quote
- TRs: amount of items included it the opportunity
- Amount: cost/ price
- Stage
- Owner
- Created
- Last activity
History
Keeps a record of all the activities done on an Account. Any modification or information added/attached is logged in the system and shown in chronological order on this tab.
The user can see this in a list with the following columns:
- Modified Date: date and time of the log
- Type: event that triggered the log
- Owner: owner of the Contact
- Modified by: user that performed the activity
Contact Menu
Now that we know some basic concepts let's see what else we can find in the Contacts Module's Menu.
New Contact
This option takes the user to the “New Contact” form. We have already seen this menu under the title "How to create a contact". That one is the form you need to complete in order to create a new contact.
View all contacts
This menu will give you access to all contacts records in the system.
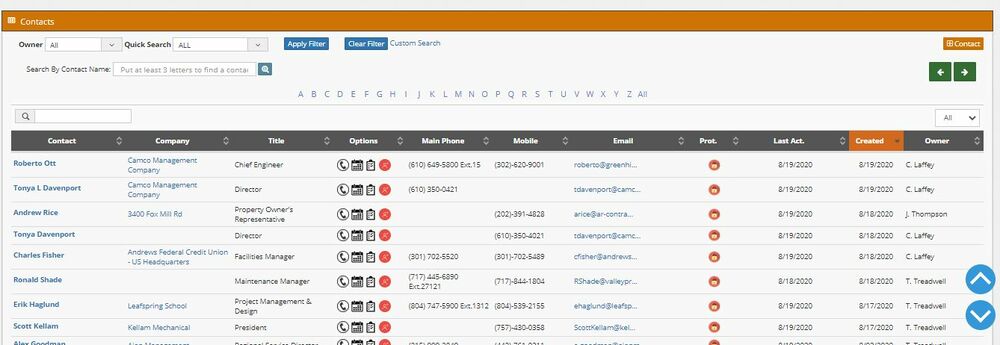
The system allows to list all the existing contacts in the database, filtered by specific parameters. There is also a search bar that can be used to refine the search by looking among the shown results.
Filters available are:
- Owner: filter by the owner of the Account
- Quick Search: filter by predefined range of time
It is also possible to activate the “Custom Search” that will enable more fields of filtering, such as:
- From date (creation)
- To date (creation)
Once the filtering is done, the system will show the results in a list. The user can search among the results by writing on the “Search” field (magnifying glass); the system will refine the results if there are matches with any field of the shown results.
On the above bar at the top right, there is a button available that work as shortcut: “+Contact”: quick Contact creation form access
The results can be extracted and downloaded to the local disk in different formats such as CSV, Excel, PDF or can be directly printed or copied to the clipboard.
Information shown in this columns:
- Contact: Contact name
- Company: Account to which the contact is related
- Title: Title assigned to the contact
- Main phone
- Mobile
- Email: Email of the contact. By double clicking on the email user can execute the “send email” feature.
- Prot: indicates if the contact is protected or not.
- Last Activity
- Created
- Owner
From this list there is also access to the column “Options”, with more buttons that work as shortcuts to:
Merge Accounts
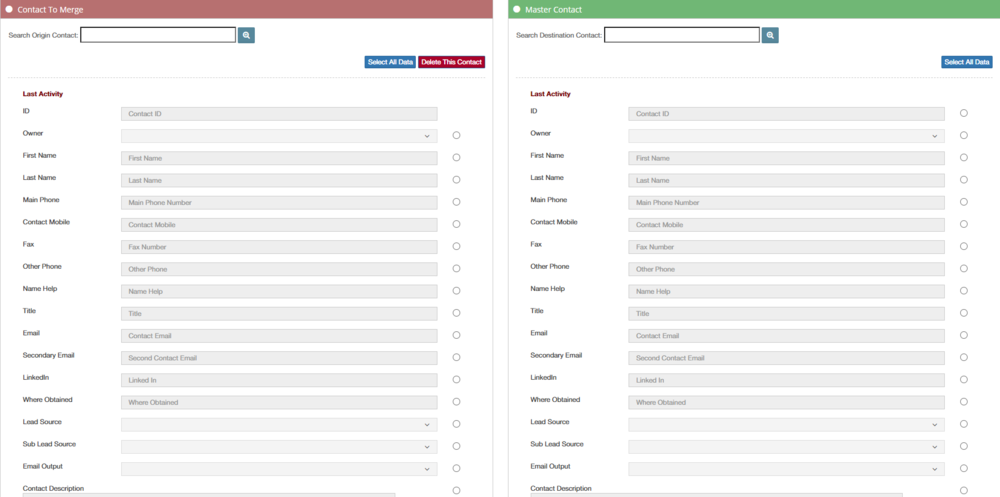
This module will allow you to merge and/or delete any contacts.
When merging a contact, all the related info will be moved to the selected destiny contact and the merged one will be deleted. To delete a contact the same process needs to be followed, but in this case there is no need of selecting a destiny.
The form to merge accounts is divided in 8 sections:
- Contact Info
- Account Info
- Opportunity Info
- Events
- Tasks Info
- Notes Info
- Emails Info
- Calls Info
The reason for these sections is to make it easier to select and edit the information the user wants to merge. Nevertheless, these sections don’t need to be all used and can be either hidden or shown. Only the first section contains mandatory fields, which for this case it means it is the minimum information that will be transferred (merged) to the destiny contact.
Steps to merge:
- Select Contact
- Select the values wishing to keep
- Select the Related info to keep in the selected Master Contact
- After this, press “Merge” button to start the process
- Users can use the option Delete After Merge to remove the contact with the remaining related data
Actions available from the Contact page
Last but not least, we have seen that there is a specific set of actions that is common to all modules, and which we have already explained before. These "common actions":
Bonus sections
Leads and Contacts
There are some nuances regarding the linking information between the modules of Contacts and Leads, that we would like to disuss:
Since Leads are lite records,if a user was to create a new Lead they can only put one person in that record. But if the lead has a parent account, in many cases we might already have the contact record in that parent account. We have the ability to either add a new contact when we create a Lead or we can choose an existing contact and assign it to that Lead by clicking this button![]() , when working on the Lead Module.
, when working on the Lead Module.
At the same time, the user could also delete the contact assigned to that Lead too.
On the other hand, if you wanted to make any changes, that is to edit the Lead record with respect to the human, you need to do this from the contact record because it is not part of the lead but part of the human. It is a different record data set.
Another important aspect to consider is that, in many cases a contact can be related to both Leads and Accounts. In other words, the same person can be the contact for a Lead and an Account. For instance, in a company like Kimco, this happens quite often.
On the same line, one of the unique things about humans is that sometimes they “move to greener pastures”. Sometimes one person will stop working for, let’s say company A, and start working for company B. They still do the same job and they still are managing sites, but doing it for different companies. So all the sites they use to manage are no longer related to them and their employers are no longer related to them.
Under this situation, we need to change the relationship between the human and the sites. When a contact leaves a company, we can break that relationship by ticking the check-box of this button in the Contact Module
This action automatically removes all accounts relationships with the contact, while keeping all previous records. We want to keep that past information so we can understand its evolution and move forward correctly.
Now, you might be wondering...What happens to all those properties now that the contact is gone? And how do we assign those properties to a new human?
Well what we have to do, now that the contact is gone, is very simple. We need to relate a new contact to those properties, let’s see the steps to do it.
Let’s pretend Debbie Keating is gone and no longer works for Kimco Realty Corp. Let’s also assume we have unrelated her contact from Kimco as well.
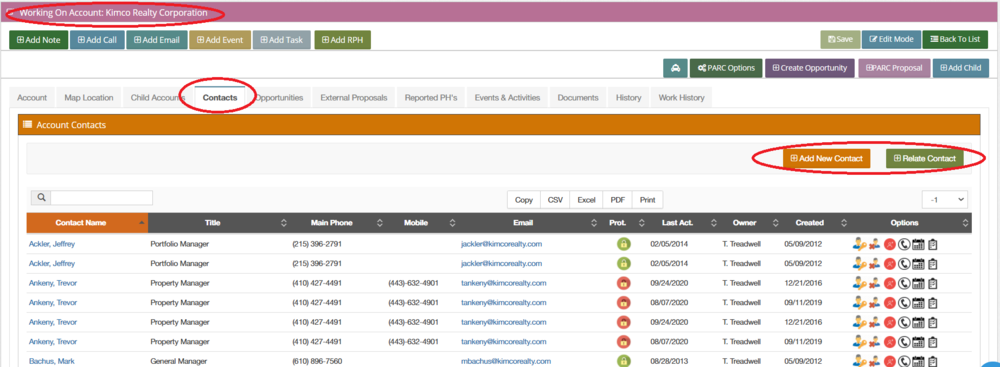
So first we need to access the account that is linked to that contact, for this case this would be Kimco and then go to the contact tab.
Here we have two options:
- We can create a new contact when there are no records for the new person taking over all Debbie’s properties, or
- We could relate an existing contact to the account, in which case the process would be easier.
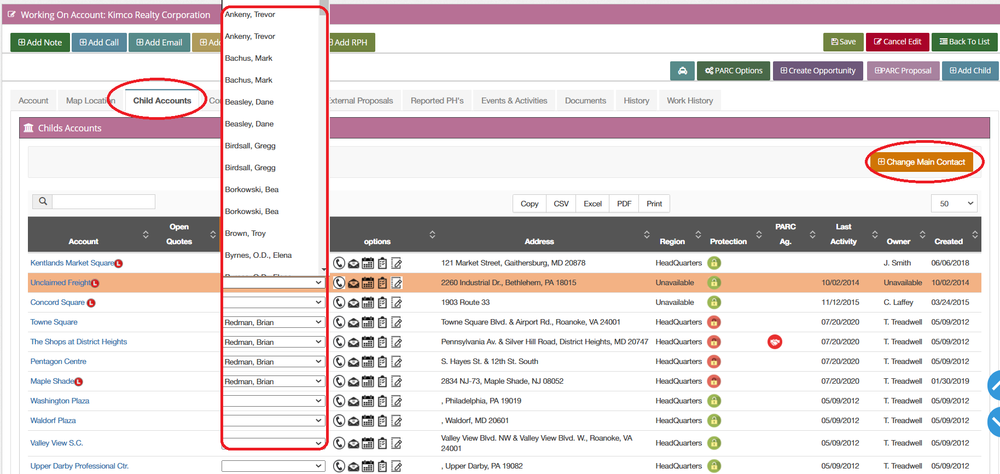
Now that we have related/ created the contact, the following step is to assign the properties to it.
To do it only need to proceed to the Child Accounts tab, click on Edit Mode, sort all the sites in order to see first those without a contact assigned and then click on Change Main Contact. This action will show a dropdown menu allowing to select the desired contact.
All contacts are special in this sense. Accounts are their own records and relate to humans, parents and children. Leads are their own records too, and they also can relate to humans, parents and children. But Contacts can not really exist and add some value in isolation...Why would we keep a contact standing free?
Remember the structure of the system and the three tips of the triangle
Contact Protection
Even tough we have previously explained this topic, it is very important to bring it once again due to he impact across the modules of the protection feature.
Having said that, the critical thing to remember about protection is that what is protected is not the site, is the human.
Let’s put it with an example:
A company like Kimco has hundreds of employees and thousands of properties they manage. In no way, shape or form we are going to say “Oh, we already have one account manager working with Kimco, so nobody else should touch Kimco”, that would be tremendously stupid, since it would pretty much impossible for one account manager to cover all Kimco’s properties while developing a relationship with all their employees.
The way protection works when you look at a company like Kimco and its child accounts, the sites that are protected are protected because the human is protected. All that can be protected is our relationship with the human.
In other words, this means when Debbie Keating is protected all the properties she manages will be protected as well.
The underlying logic here is:
If Trevor Treadwell is selling lots of repairs to Debbie Keating we don’t want someone else to call in Debbie trying to sell her because,
Trevor developed that relationship with her and From an institutional perspective, the odds of somebody else coming in and annoying Debbie and hurting the process are greater than the odds of somebody else coming in and doing any better.
For more information about the protection feature, please redirect to these two sections of the wiki:
